


Thinning hair in men is the gradual reduction of hair density, meaning fewer visible hairs per square inch of scalp and/or thinner individual hair strands. It is not the same as full baldness. Thinning is the transitional stage where the hair becomes sparser, finer, and less voluminous over time. This condition often influences the choice of haircuts for men with thin hair, as the right style can create the appearance of greater fullness and volume.
The medical term for the most common type is androgenetic alopecia (male pattern baldness). It affects approximately 50 million men in the United States alone, according to the American Academy of Dermatology.
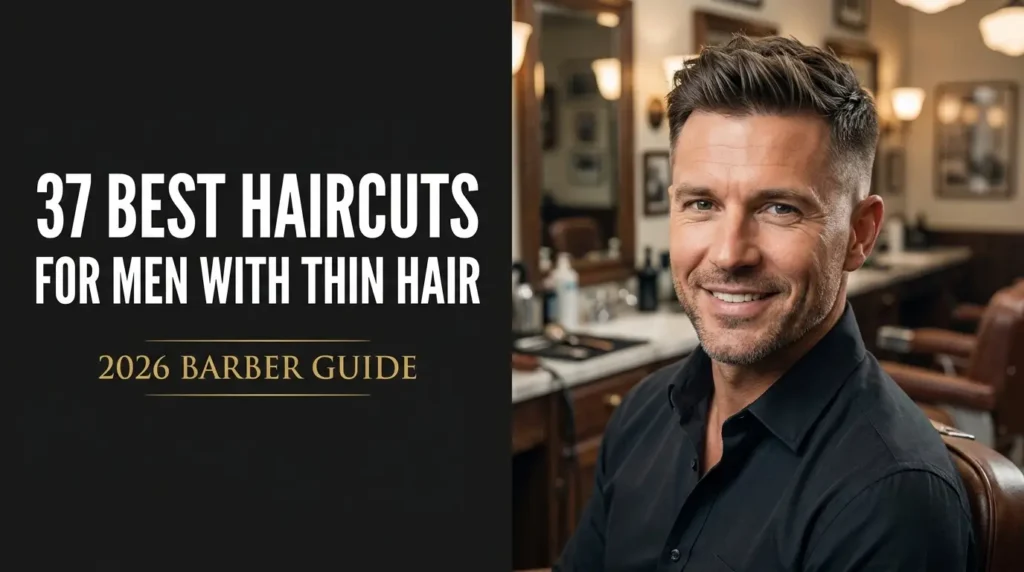
35+ Best Haircuts for Men with Thinning Hair
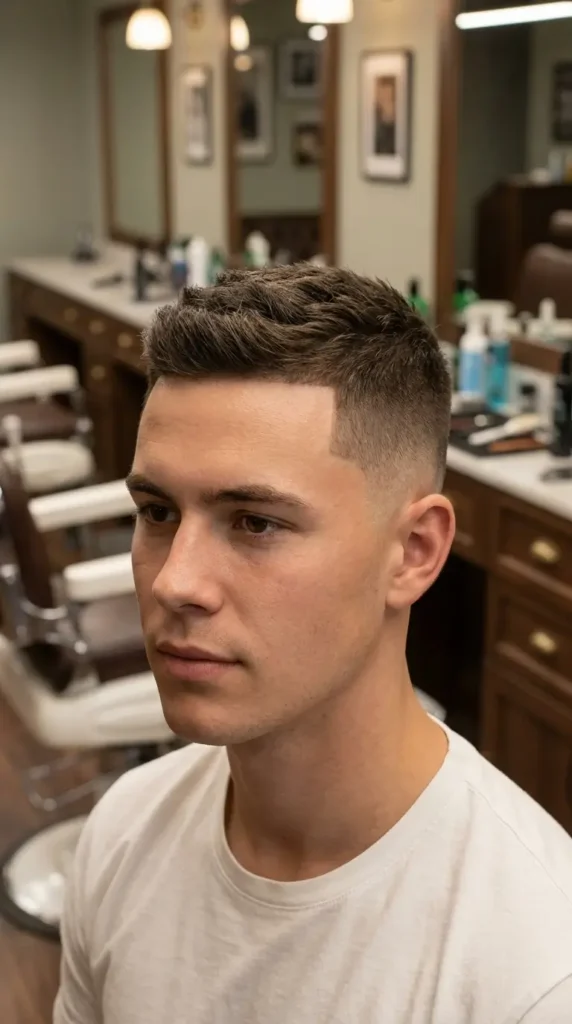
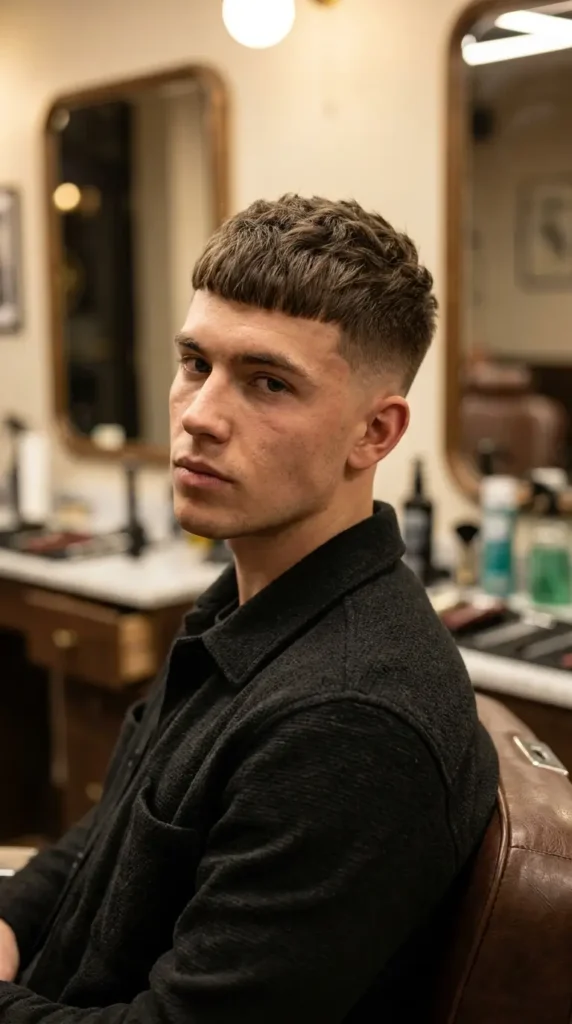
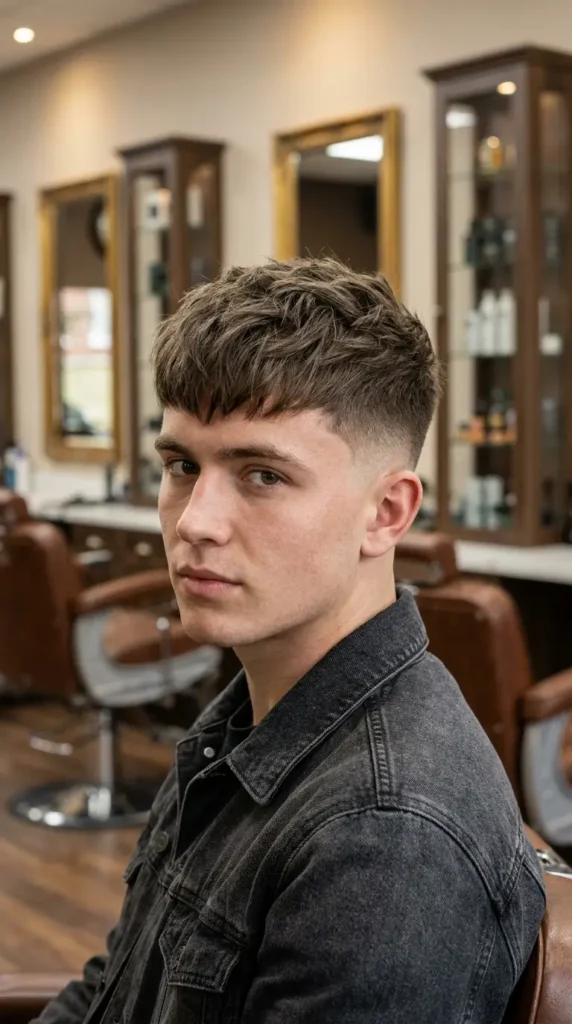
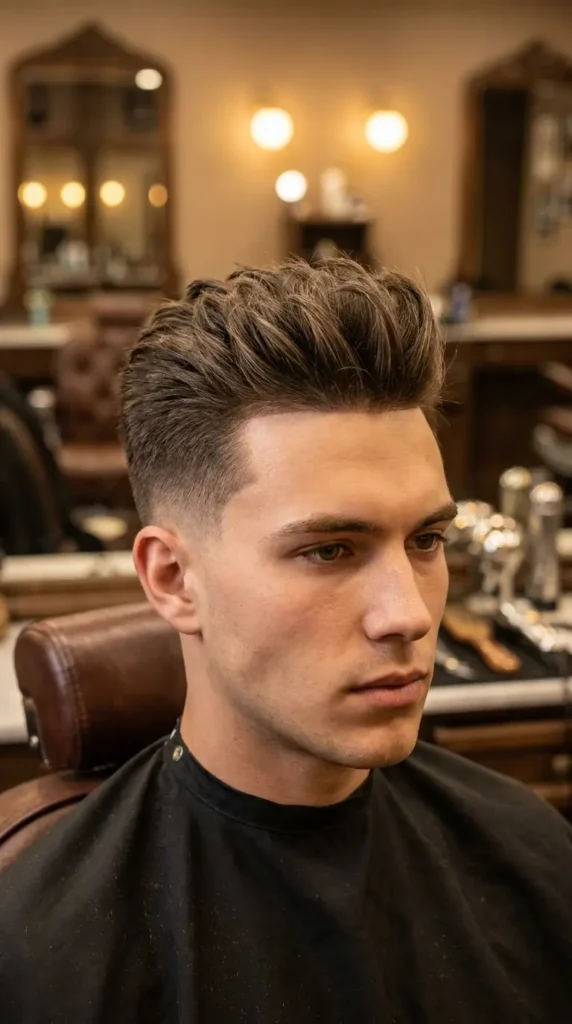
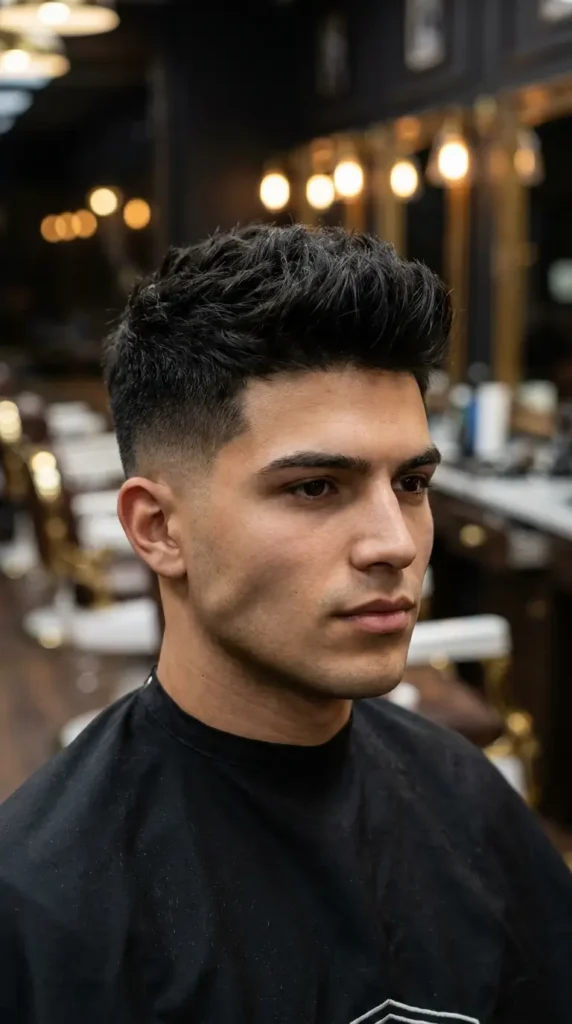
1. Textured Crop
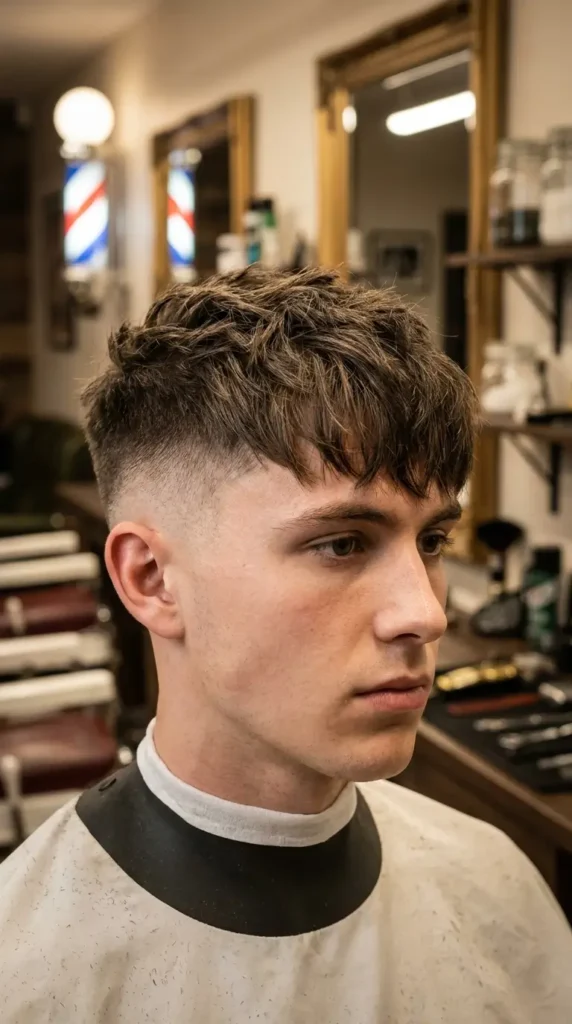
The textured crop is the single most recommended haircut for thinning hair by professional barbers. Short, choppy layers on top create natural lift and movement that makes hair appear significantly denser. The sides are cut close (usually a fade or short taper) to direct all visual attention to the textured top.
Why it works for thinning hair: The uneven, piece-y texture prevents thin strands from lying flat and exposing the scalp. Each strand sits at a slightly different angle, creating optical density.
What you need: 1.5–3 inches on top, fade or short taper on sides Thinning pattern: Crown thinning, diffuse thinning, early recession Face shape: All face shapes (universally flattering) Styling: Work a pea-sized amount of matte clay through dry hair, shaping with fingers for separation Maintenance: Trim every 4–5 weeks
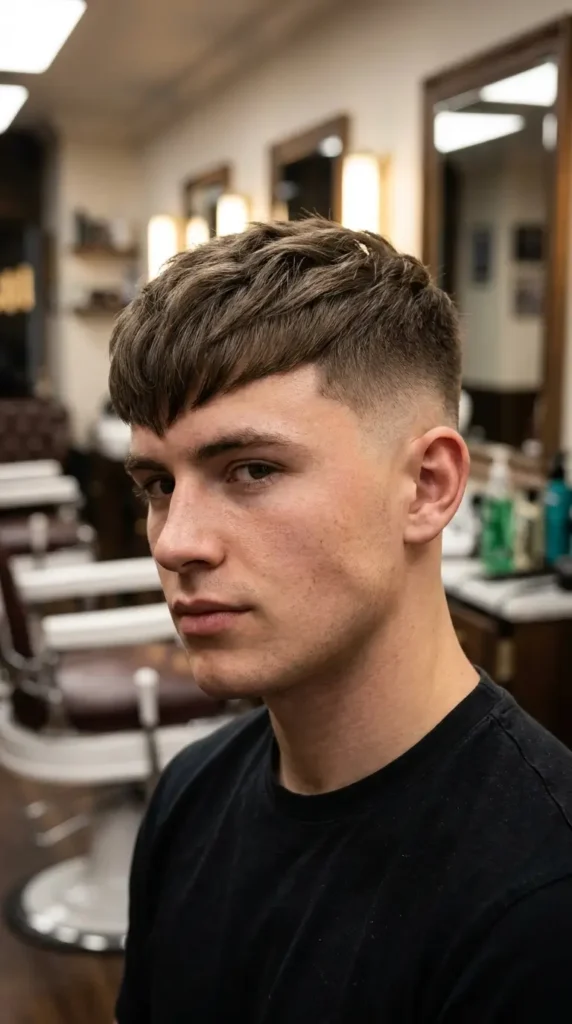
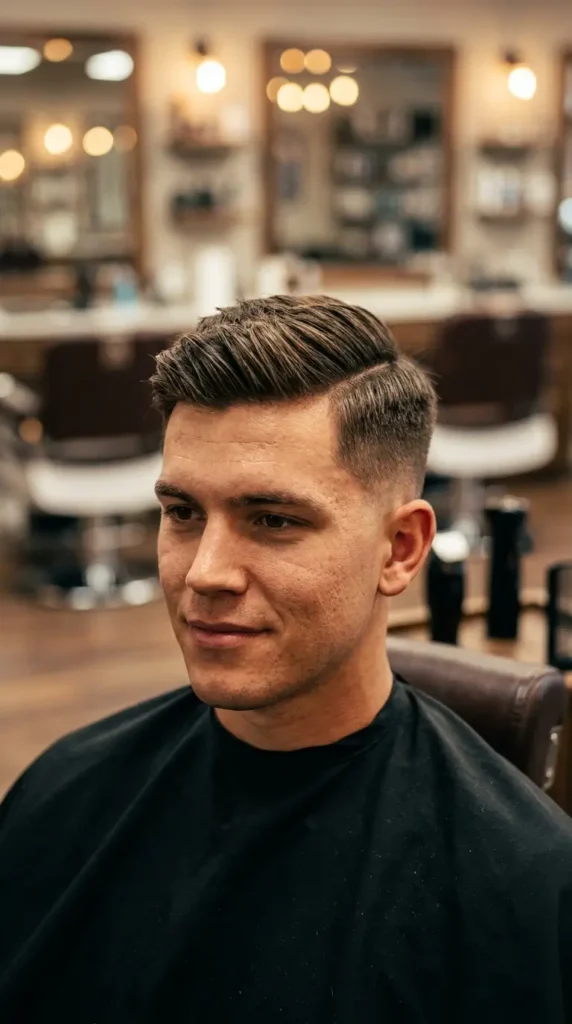
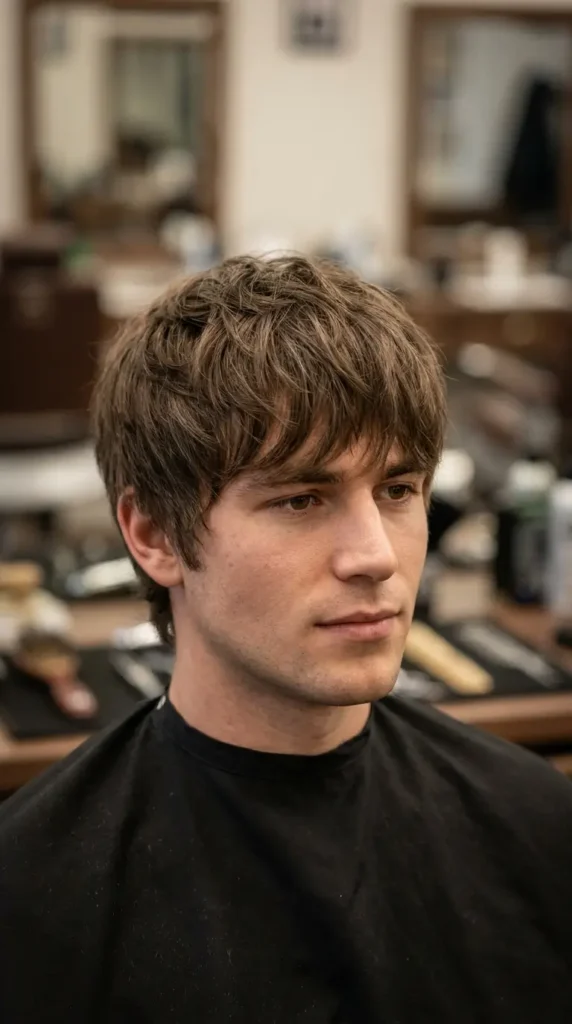
2. French Crop
The French crop uses a short, blunt fringe that falls forward across the forehead while the sides are kept tight with a high fade. For men with thinning hair, this forward-falling fringe acts as camouflage for a receding hairline, covering the territory where thinning is most visible.
Why it works for thinning hair: The forward fringe conceals the hairline completely. The choppy top adds texture and lift at the crown. The high-faded sides draw attention upward to the fuller textured area.
What you need: 1–3 inches on top falling forward, high fade on sides Thinning pattern: Temple recession, receding hairline, frontal thinning Face shape: Heart and oblong (the fringe shortens the face visually) Styling: Blow-dry forward, shape fringe with fingers, apply light molding paste Maintenance: Trim every 3–4 weeks
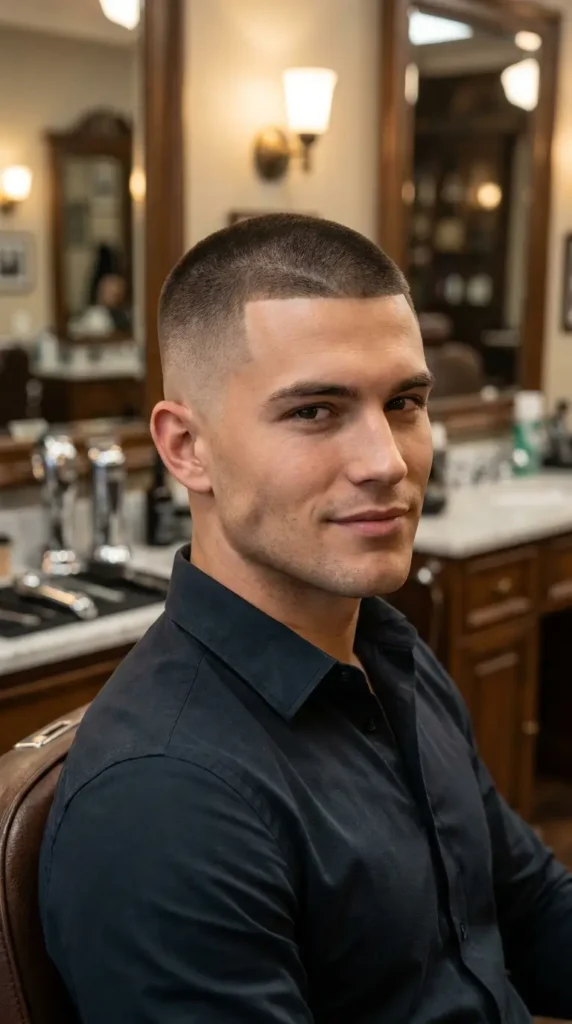
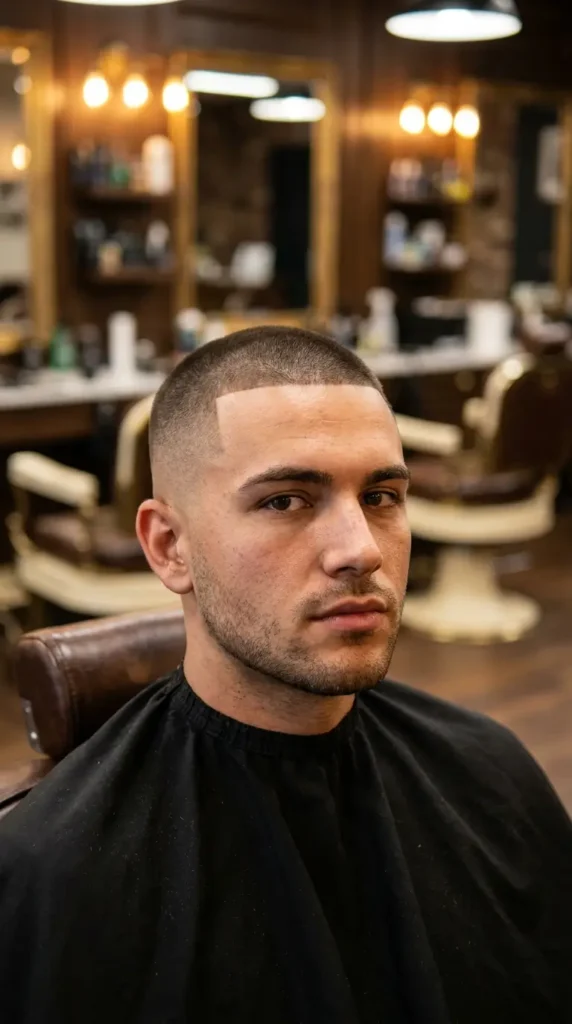
3. Buzz Cut
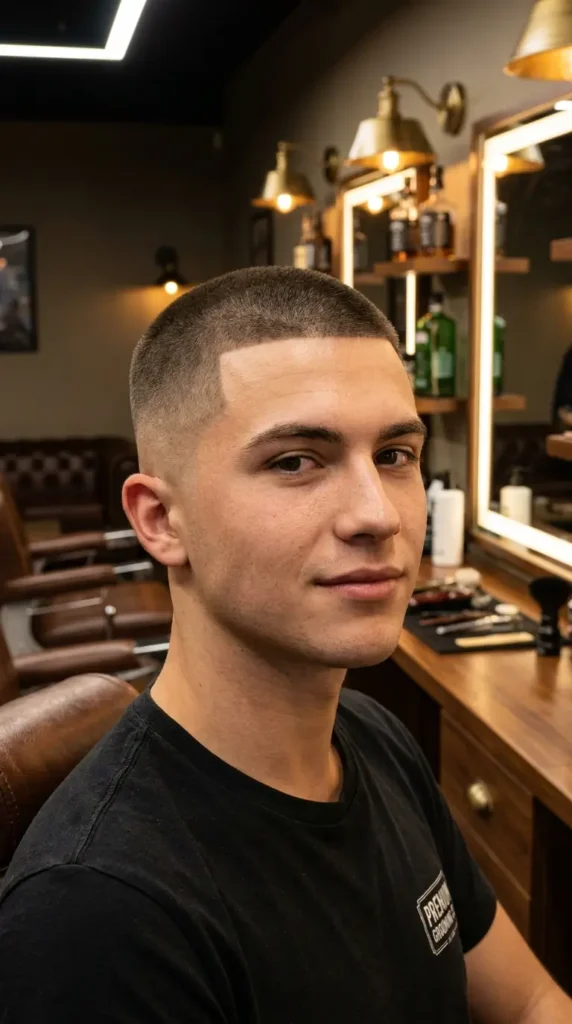
The buzz cut uses a single clipper guard across the entire head (#1–#3), creating uniform ultra-short length everywhere. For thinning hair, this works by eliminating contrast: when all hair is the same minimal length, the eye cannot detect density differences between thick and thin areas.
Why it works for thinning hair: There is simply not enough length for scalp to show through. The uniformity makes thin areas invisible because there is nothing to compare against. This is the lowest-maintenance, highest-confidence option for men at Norwood Stage 3+.
What you need: Clippers, one guard length, zero styling effort Thinning pattern: All patterns, particularly excellent for advanced thinning (Norwood 4–5) Face shape: Best for men with strong facial features (jaw, cheekbones) since the cut hides nothing Styling: Zero products, zero effort Maintenance: Self-trim every 1–2 weeks or barber visit every 2–3 weeks
Celebrity reference: Jason Statham has built his entire image around the buzzed look with thinning hair, proving that owning the style with confidence makes it powerful rather than defeatist.
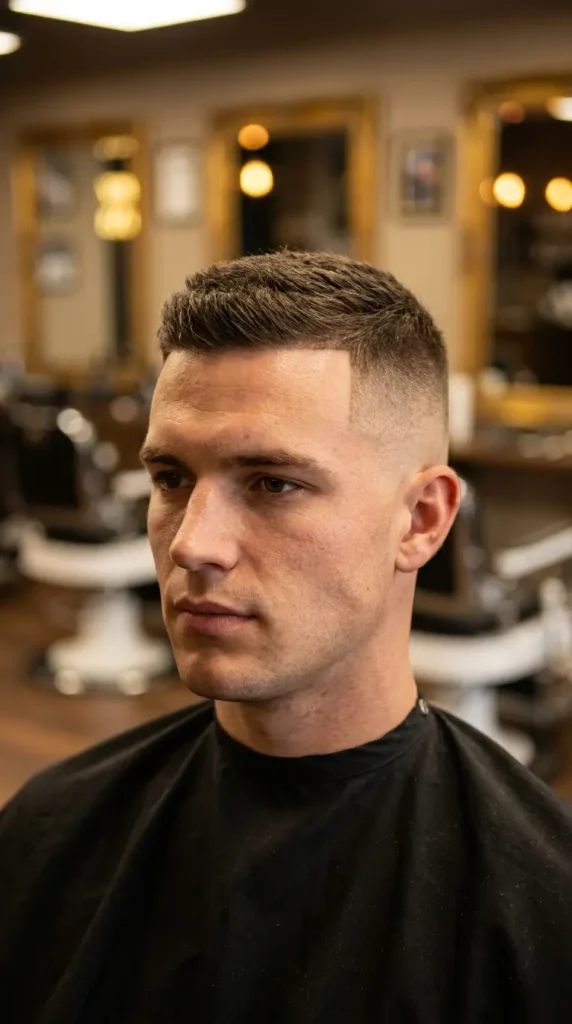
4. Crew Cut
The crew cut keeps the top short (0.5–2 inches) and tapered slightly from front to back, with the sides clipped tighter. For thinning hair, the even short length makes everything appear thicker and more balanced because there is no contrast between dense and sparse areas.
Why it works for thinning hair: The short, even length reduces scalp visibility. The slight taper means the front has marginally more length (drawing the eye forward to the fuller area). The tight sides eliminate visual comparison.
What you need: 0.5–2 inches on top, tight sides (#1–#2 guard) Thinning pattern: Crown thinning, diffuse thinning, overall density loss Face shape: All face shapes; the safest, most universally appropriate option Styling: Optional: light texture powder for subtle lift, or no product at all Maintenance: Trim every 3–4 weeks
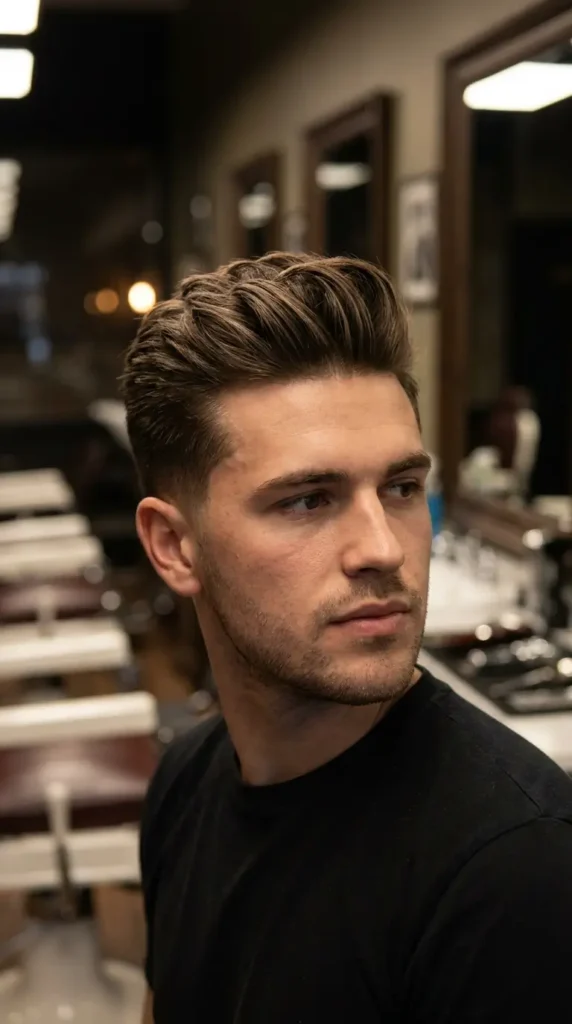
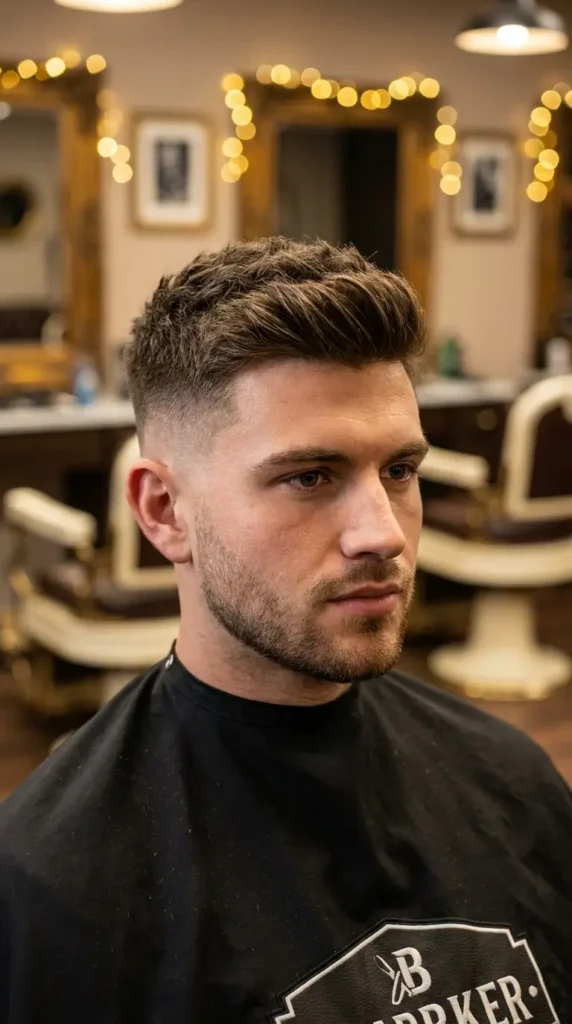
5. Classic Quiff
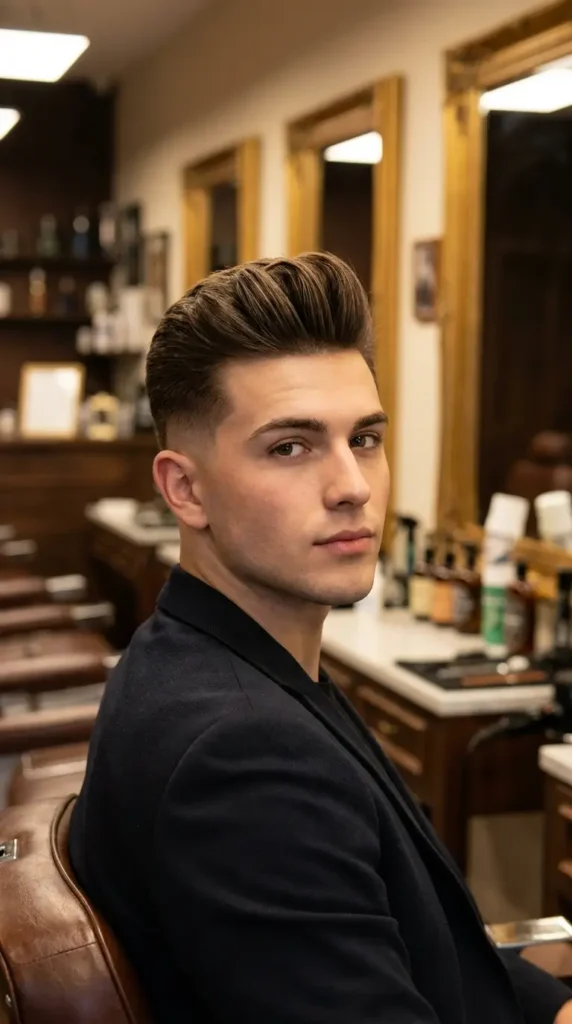
The classic quiff lifts the front hair upward and slightly forward, creating height and volume at the forehead. For thinning hair, this upward lift makes the front section look significantly fuller than it actually is; the blow-dried volume creates the illusion of density. For a more textured variation, explore the textured quiff which adds choppy movement to the lifted shape.
Why it works for thinning hair: Lifting hair UP rather than letting it fall flat means strands are stacked vertically, creating the appearance of more hair. The height draws the eye upward, away from any thinning at the crown or temples.
What you need: 2–4 inches on top, short sides Thinning pattern: Temple recession (draws attention up and away from hairline) Face shape: Round and square (adds flattering height) Styling: Blow-dry upward at roots with round brush, finish with texture powder for weightless hold Maintenance: Trim every 4–5 weeks
Tip: Use a lightweight texture powder rather than pomade or gel. Heavy products compress thin hair against the scalp and make thinning more visible. Powder lifts from the roots without adding any weight.
6. Textured Fringe
The textured fringe cuts the front hair into short, uneven layers that fall forward across the forehead in a deliberately messy, piece-y fashion. For thinning men, this creates gentle coverage over a receding hairline while the choppy texture prevents the fringe from looking flat or thin.
Why it works for thinning hair: The uneven lengths create overlapping layers that visually fill in the front. The texture gives the impression of more hair. The short sides push focus to the fuller-looking textured top.
What you need: 2–3 inches on top with forward-falling layers, fade on sides Thinning pattern: Receding hairline, frontal thinning, temple recession Face shape: All, particularly good for heart and oblong faces Styling: Blow-dry forward with fingers, apply light molding paste for piece-y definition Maintenance: Trim every 4–5 weeks
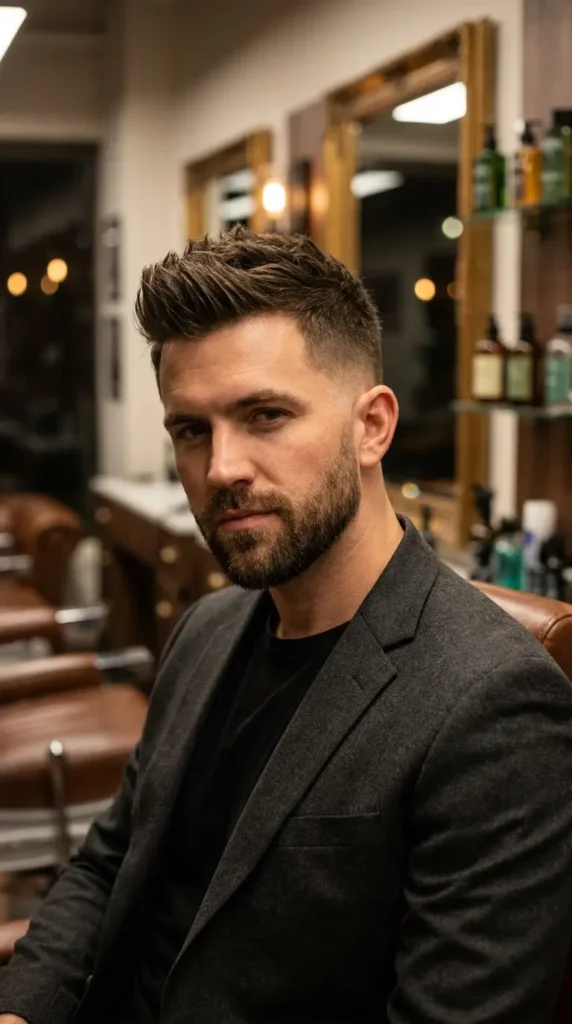
7. Pompadour

The pompadour sweeps all the top hair upward and backward from the forehead, creating significant height and volume. For thinning hair, the blown-back volume makes the hair look dramatically fuller because strands are stacked vertically rather than lying flat.
Why it works for thinning hair: The upward lift creates the optical illusion of density. The height at the front is visually dominant; it draws all attention to the volume zone rather than any thinning areas. Short faded sides make the voluminous top look even more impressive by contrast.
What you need: 3–5 inches on top, short sides Thinning pattern: Early thinning (Norwood 2–3), still have enough density to create volume Face shape: Round and square (adds elongation and structure) Styling: Blow-dry upward with round brush, apply volumizing mousse BEFORE drying for maximum lift Maintenance: Trim every 4–5 weeks
Key Point: The pompadour only works if you still have moderate density on top. If thinning is advanced (Norwood 4+), the blown-back style can expose too much scalp. In that case, a forward-falling style (crop, fringe) or buzz cut is a better choice.
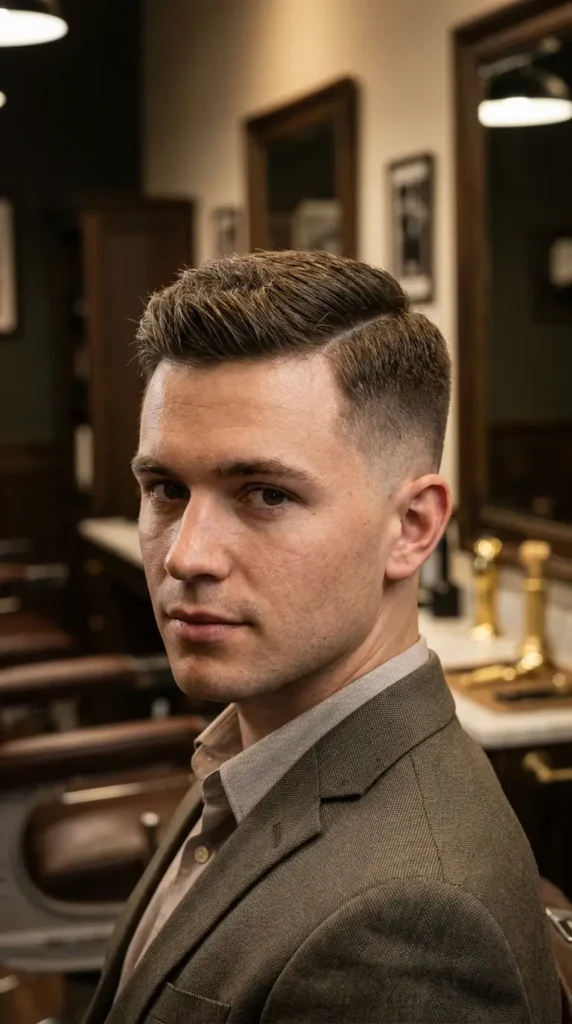
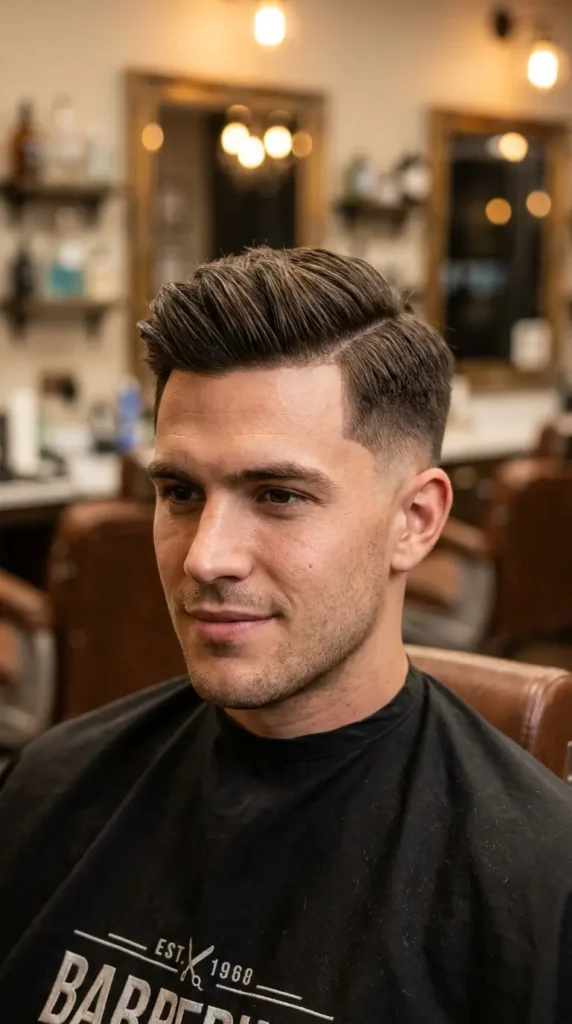
8. Side Part
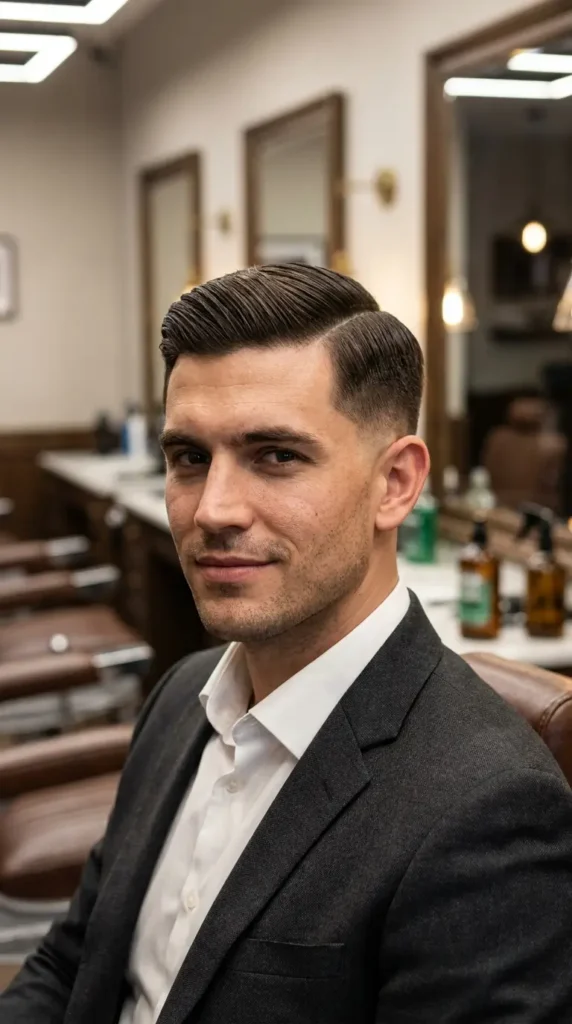
The side part divides the hair at a natural parting line and sweeps it to one side. For thinning hair, the directional sweep concentrates hair mass on one side, making that section appear thicker. The clean part line adds structure that reads as intentional and polished rather than messy or thinning.
Why it works for thinning hair: Sweeping hair in one direction means strands stack together rather than separating. This creates concentrated density on the dominant side. The shorter opposite side is covered by the directional flow.
What you need: 2–4 inches on top, short sides, natural or hard part Thinning pattern: Diffuse thinning, early crown thinning Face shape: All; one of the most universally flattering and professional options Styling: Blow-dry with direction (following the part), light pomade or styling cream for hold Maintenance: Trim every 4–5 weeks
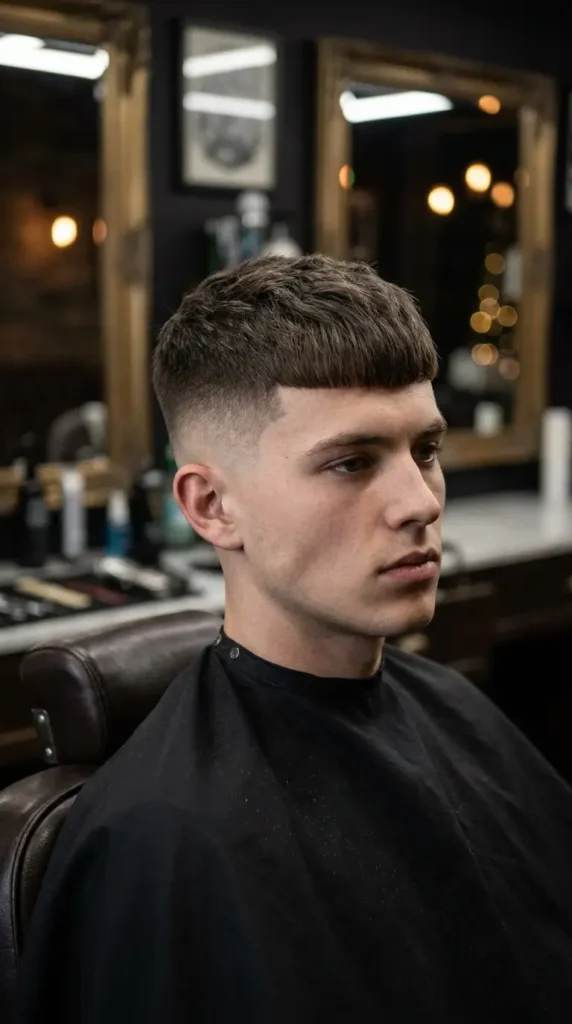
9. Caesar Cut
The Caesar cut keeps all the top hair short (0.5–1.5 inches) with a small, straight-across fringe at the front. The hair lies flat and forward in horizontal layers. For thinning hair, the even, short length makes everything look uniform while the micro-fringe covers a receding hairline.
Why it works for thinning hair: The short, uniform length eliminates visual contrast between thick and thin zones. The forward fringe covers recession at the front. The flat-lying style does not separate strands the way lifted styles can.
What you need: 0.5–1.5 inches all over, small straight fringe Thinning pattern: Receding hairline, frontal thinning, diffuse thinning, Norwood 3–4 Face shape: All, particularly good for men with larger foreheads (see our guide to haircuts for big foreheads for more options) Styling: No product required; the cut IS the style Maintenance: Trim every 3–4 weeks
Celebrity reference: George Clooney wore a Caesar cut during his early career when his hairline began maturing, proving it works across age groups and professional contexts.
10. Ivy League
The Ivy League is an extended crew cut: slightly longer on top (2–3 inches) with enough length to brush to one side or style with a subtle part. For thinning hair, it provides just enough length for styling options while staying short enough to prevent scalp exposure.
Why it works for thinning hair: It bridges the gap between the ultra-short buzz/crew cut and longer styled cuts. The added length creates the possibility for directional styling (which concentrates density) without being long enough to separate and expose scalp.
What you need: 2–3 inches on top, graduated sides Thinning pattern: Early thinning (Norwood 2–3), diffuse thinning Face shape: All; extremely versatile and professional Styling: Light styling cream or pomade, comb to one side Maintenance: Trim every 4–5 weeks
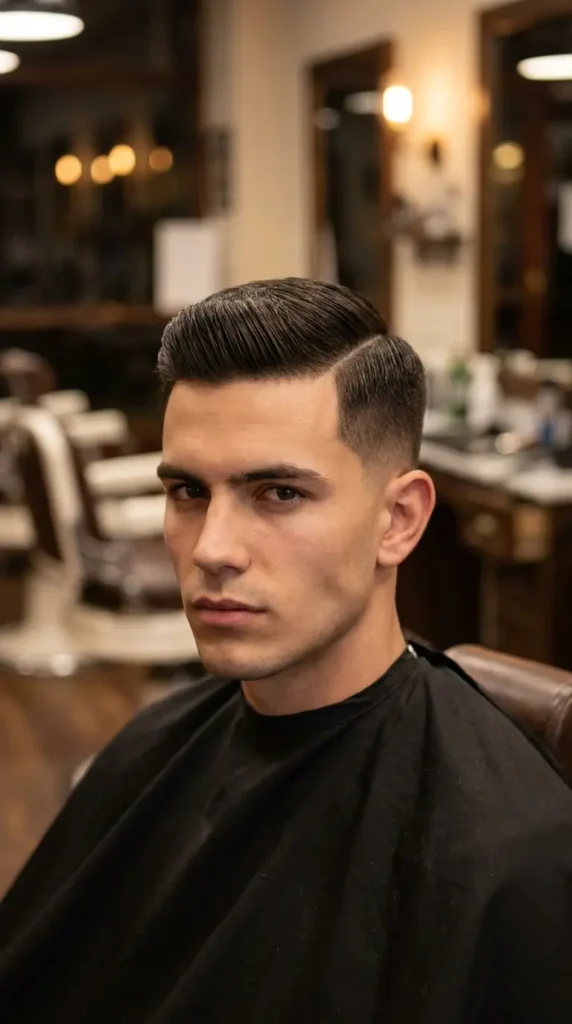
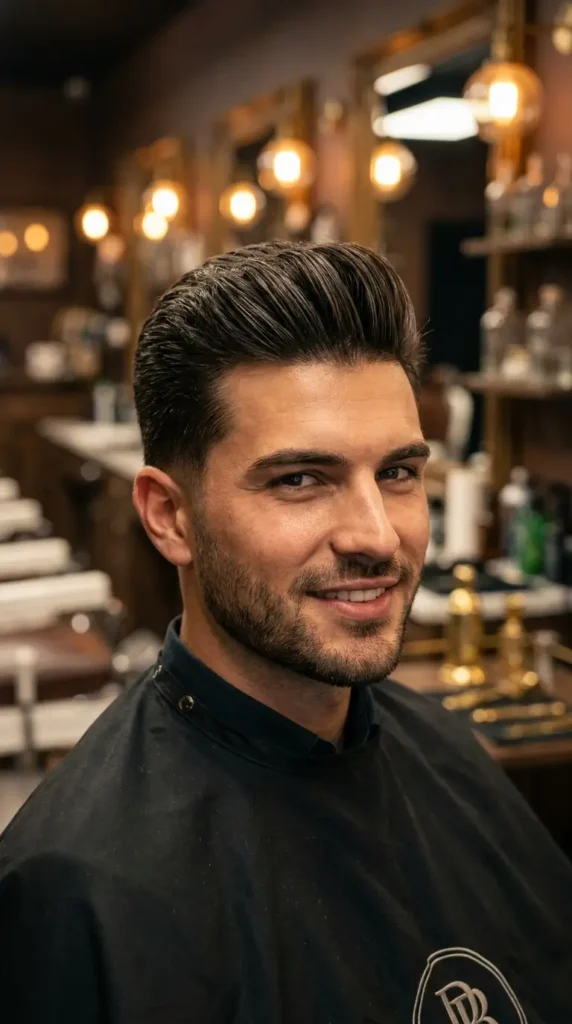
11. Slicked Back
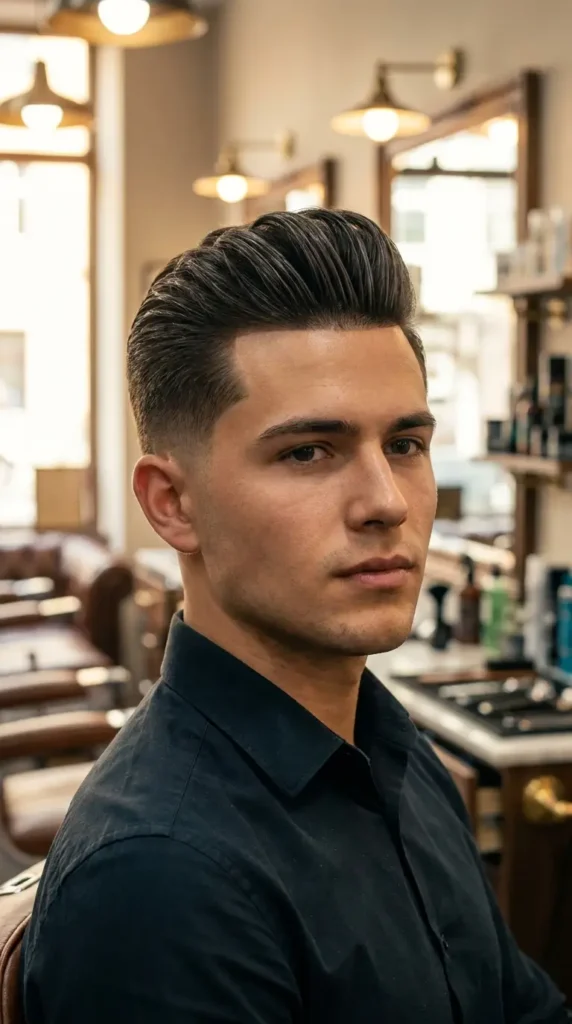
The slicked back style combs all top hair smoothly away from the face, held in place with product. For thinning hair, this works when there is still moderate density; the backward sweep concentrates strands together and creates height at the front that looks voluminous.
Why it works for thinning hair: Combing hair backward means all strands are moving in the same direction, which prevents separation. The product holds everything together as one mass rather than individual thin strands.
What you need: 3–4 inches on top, short sides Thinning pattern: Early thinning only (Norwood 2–3); NOT suitable for advanced thinning Face shape: Oval, square, diamond Styling: Blow-dry backward for direction, finish with lightweight pomade (water-based, not oil-based) Maintenance: Trim every 4–5 weeks
Important Warning: If your thinning is moderate-to-advanced, the slicked back style will expose your scalp. The backward direction pulls hair away from the hairline, revealing recession. Only use this style if your top density is still adequate.
12. Buzz Cut with Skin Fade
The buzz cut paired with a skin fade takes the standard buzz and adds a graduated fade on the sides that goes from bare skin at the temples up to the buzz length. The contrast between the skin-faded sides and the slightly longer top creates subtle but effective dimension.
Why it works for thinning hair: The skin fade eliminates the visual difference between thinning sides and a thinning top. The fade is INTENTIONALLY bare, so any thinning blends into the deliberate design rather than standing out as hair loss.
What you need: #2–#3 guard on top, skin fade (no guard) on sides blending upward Thinning pattern: All patterns, particularly advanced (Norwood 4+) Face shape: All, particularly strong-featured faces Styling: Zero effort Maintenance: Barber touchup every 2–3 weeks for the fade
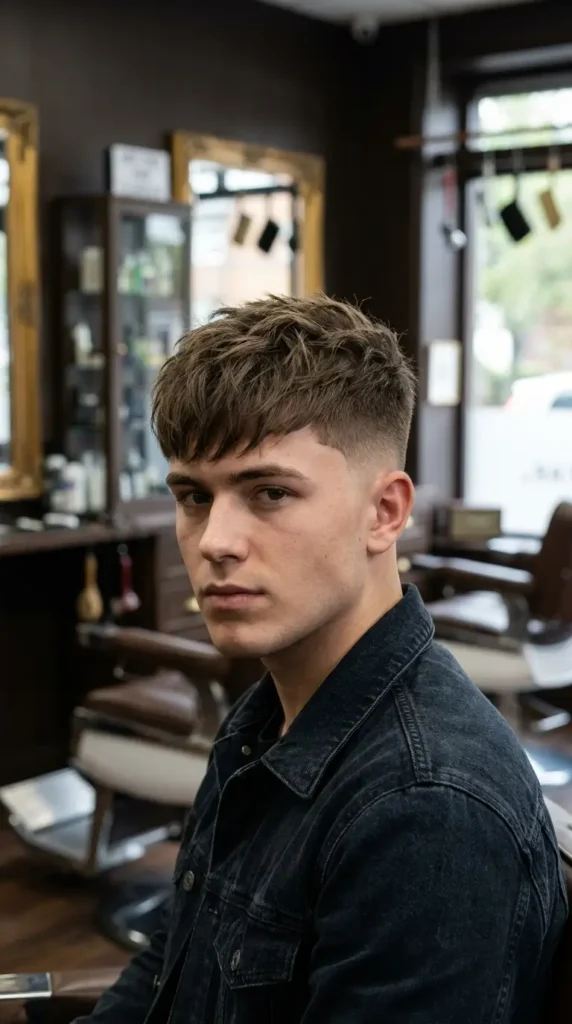
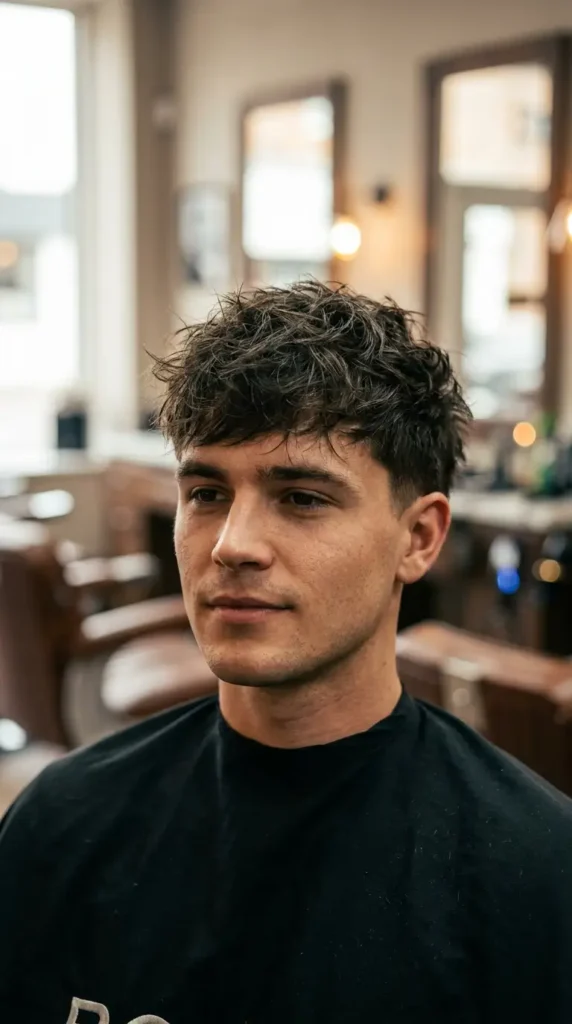
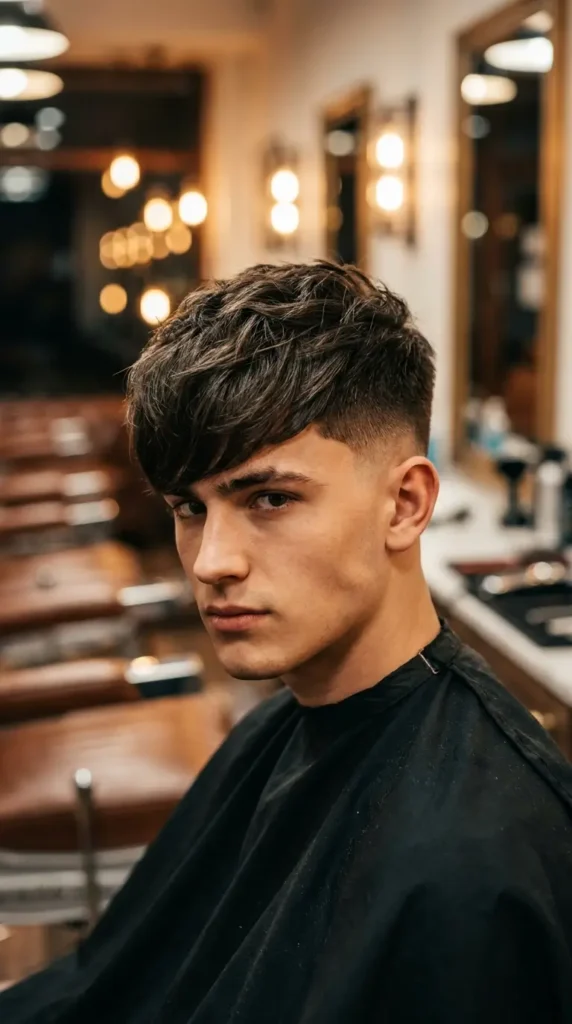
13. Choppy Fringe
The choppy fringe cuts the front hair into short, uneven pieces that make the fringe look intentionally deconstructed. For thinning hair, the irregular lengths overlap and stack, creating the visual impression of more hair than is actually present. For additional fringe inspiration, see our full guide on fringe hairstyles for men.
Why it works for thinning hair: Choppy pieces at different lengths layer over each other, filling gaps between strands. The asymmetric texture disguises areas where density is lower.
What you need: 2–3 inches at front, shorter toward crown, fade on sides Thinning pattern: Receding hairline, frontal thinning Face shape: All face shapes Styling: Matte clay worked into dry hair, shaped with fingers Maintenance: Trim every 4–5 weeks
14. Angular Fringe
The angular fringe cuts the front section at a sharp diagonal angle across the forehead. Rather than a straight-across fringe, the hair sweeps diagonally. For thinning hair, this creates directional movement that covers a wider area of the forehead with less actual hair.
Why it works for thinning hair: The diagonal angle means each strand covers more horizontal distance across the forehead. Less hair is needed to create the appearance of full coverage because the angle spreads it efficiently.
What you need: 2–4 inches at front (diagonal), shorter sides Thinning pattern: Temple recession, receding hairline Face shape: All (adds shape and visual interest) Styling: Blow-dry at an angle, set with molding paste Maintenance: Trim every 4–5 weeks
15. Short Textured Quiff
The short textured quiff is a scaled-down version of the classic quiff: shorter length (2–3 inches), more texture, less volume. For thinning hair, it creates lift without requiring enough density to support a full, voluminous quiff.
Why it works for thinning hair: The texture breaks up the surface so thinning is less visible. The shortened length means strands stay close together rather than separating. The mild lift adds just enough height to look styled without exposing scalp.
What you need: 2–3 inches on top, fade on sides Thinning pattern: Early-to-moderate crown thinning, mild recession Face shape: Round and square (adds subtle height) Styling: Texture powder at roots, finger-shape upward Maintenance: Trim every 4–5 weeks
16. Faux Hawk
The faux hawk creates a raised central ridge from forehead to crown. For thinning hair, the upward-directed styling concentrates hair in the center of the head, right where thinning is often most visible (the crown path), covering it with lifted, textured hair.
Why it works for thinning hair: The central ridge directs ALL hair toward the middle-top, which is precisely where most men thin. Concentrating hair in that zone camouflages the sparse areas.
What you need: 2–3 inches on top, tight fade on sides Thinning pattern: Crown thinning, vertex/midline thinning Face shape: Oval and round (adds height and structure) Styling: Texture clay worked upward and inward from both sides Maintenance: Trim every 4–5 weeks
17. Side-Swept
The side-swept style brushes all the top hair gently to one side, creating a relaxed directional flow. For thinning hair, the lateral sweep concentrates strands together on one side, making that section appear thicker while covering any thin spots beneath the swept direction.
Why it works for thinning hair: Hair moving in a single direction compresses together rather than separating. The sweep covers the scalp beneath as it crosses over. The longer side compensates for any thinning by creating concentrated visual density.
What you need: 2–4 inches on top, shorter sides Thinning pattern: Diffuse thinning, temple recession on one side Face shape: All; soft, easy, universally appropriate Styling: Blow-dry in sweeping direction, light styling cream for hold Maintenance: Trim every 4–5 weeks
18. Messy Layered Cut
The messy layered cut uses irregular lengths throughout the top that are styled in multiple directions for an intentionally tousled, lived-in appearance. For thinning hair, the multi-directional movement means strands cross over each other, creating coverage from multiple angles. If you want more inspiration for this kind of look, check out our guide on short messy hairstyles for guys.
Why it works for thinning hair: Random layering means hairs at different lengths overlap continuously. This creates depth and dimension that makes hair appear denser than a flat, uniform style would.
What you need: 2–4 inches on top with varied layering Thinning pattern: Overall diffuse thinning, early crown thinning Face shape: All (the messiness suits relaxed personalities) Styling: Sea salt spray on damp hair, scrunch with fingers while blow-drying Maintenance: Trim every 5–6 weeks
19. Spiky Haircut
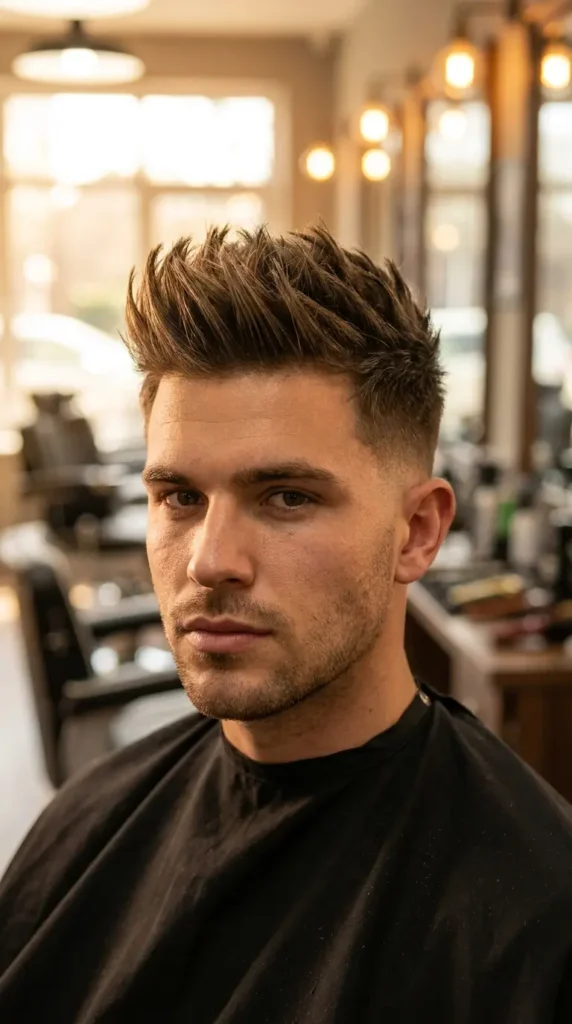
The spiky haircut lifts short strands straight upward into pointed tips. For thinning hair, the vertical direction means every strand is standing up rather than lying flat; this makes each individual hair more visible and creates the impression of more overall volume.
Why it works for thinning hair: Vertical spikes occupy more visual space than flat-lying hair. The upward direction means every strand is actively contributing to the appearance of density rather than being compressed against the scalp.
What you need: 1.5–3 inches on top, tight fade on sides Thinning pattern: Crown thinning, early diffuse thinning Face shape: Round and heart (adds angular height) Styling: Strong-hold texture clay or wax, pull upward in sections Maintenance: Trim every 4 weeks
20. Wavy Shag
The wavy shag uses longer, layered lengths with intentional wave or curl throughout. For thinning hair, waves and curls naturally occupy more space than straight hair; each wave bends outward, creating volume and coverage that straight strands cannot achieve. Men with natural wave texture can find more options in our wavy hairstyles for men guide.
Why it works for thinning hair: Waves create natural body and movement that fills space. The layering adds dimension at multiple levels. The relaxed, purposely messy quality means thinning blends into the texture rather than standing out.
What you need: 3–5 inches throughout with layering, natural wave or enhanced with product Thinning pattern: Early thinning (Norwood 2–3) with adequate remaining density Face shape: Oval, square, diamond Styling: Sea salt spray on damp hair, air dry or diffuse, shape waves with fingers Maintenance: Trim every 6–8 weeks
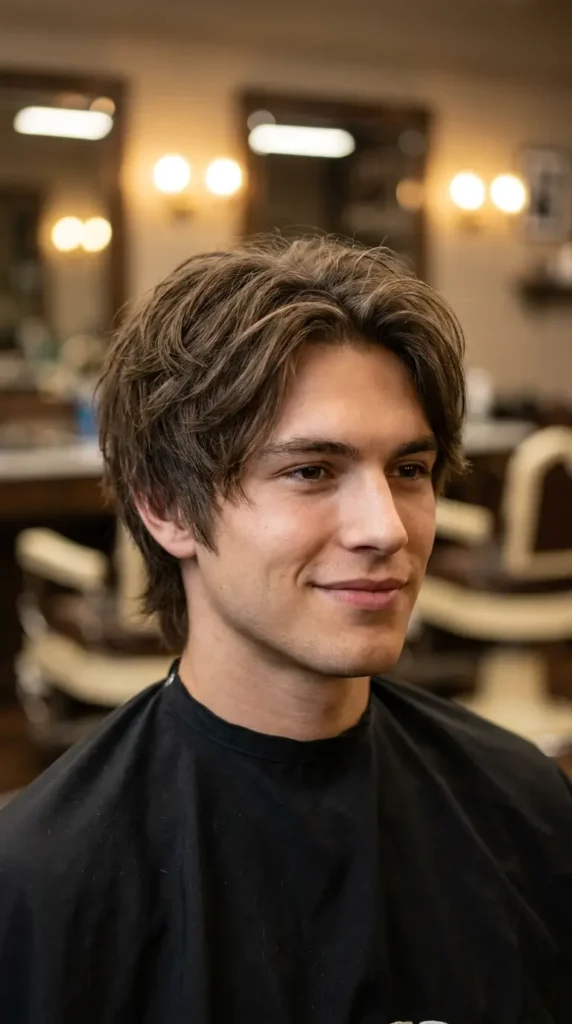
21. Bro Flow
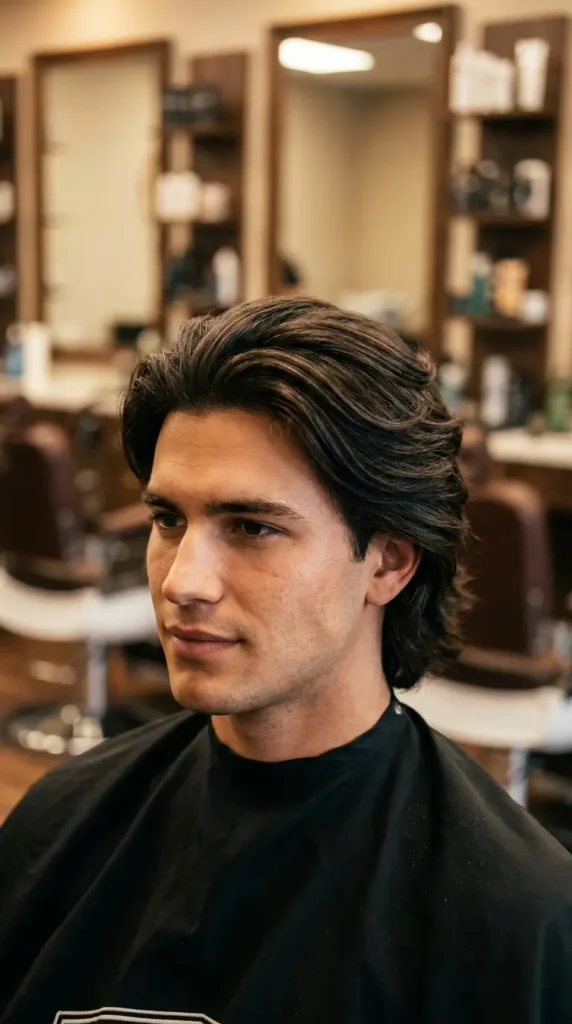
The bro flow lets medium-length hair grow naturally and fall back away from the face with its own weight and movement. For thinning hair that still has decent density, the natural bend and movement creates fullness without heavy styling.
Why it works for thinning hair: The natural backward flow concentrates hair together. Medium length has enough mass to create visual density without being long enough to separate excessively. The relaxed quality looks intentional rather than trying to hide anything.
What you need: 3–5 inches of naturally flowing hair Thinning pattern: Very early thinning only (Norwood 1–2) Face shape: Oval and heart (works with angular or balanced features) Styling: Blow-dry backward with fingers, light styling cream for soft hold Maintenance: Trim every 6–8 weeks
Important: The bro flow only works for early thinning with good remaining density. If hair has noticeably reduced density, medium length will separate and expose the scalp. Switch to a shorter textured style once thinning progresses.
22. Buzz Cut with Line-Up
The buzz cut with line-up adds razor-sharp geometric edges at the hairline: clean lines at the forehead, temples, and sideburns. For thinning hair, the precise edge work creates an intentional, styled framework around the face that makes the buzz look deliberate and polished rather than purely functional. Pairing it with a beard can add extra dimension; see our buzz cut with beard guide for inspiration.
What you need: #1–#3 guard all over, razor line-up at edges Thinning pattern: All patterns, all stages Face shape: All (the line-up adds definition to any face structure) Styling: Zero daily effort; the line-up is the style Maintenance: Line-up touchup every 1–2 weeks
23. High Fade with Short Top
The high fade with short top removes the sides almost entirely (fading to skin from the parietal ridge) while keeping 1–2 inches of textured hair on top. For thinning hair, this creates clean contrast that reads as a deliberate style choice; the faded sides are MEANT to be bare, so any thinning on top is contextualized within an already-short framework.
What you need: 1–2 inches on top, high skin fade on sides Thinning pattern: All patterns, an excellent choice for moderate-to-advanced thinning Face shape: All, particularly oval and square Styling: Optional texture powder for lift, or no product Maintenance: Fade touchup every 2–3 weeks
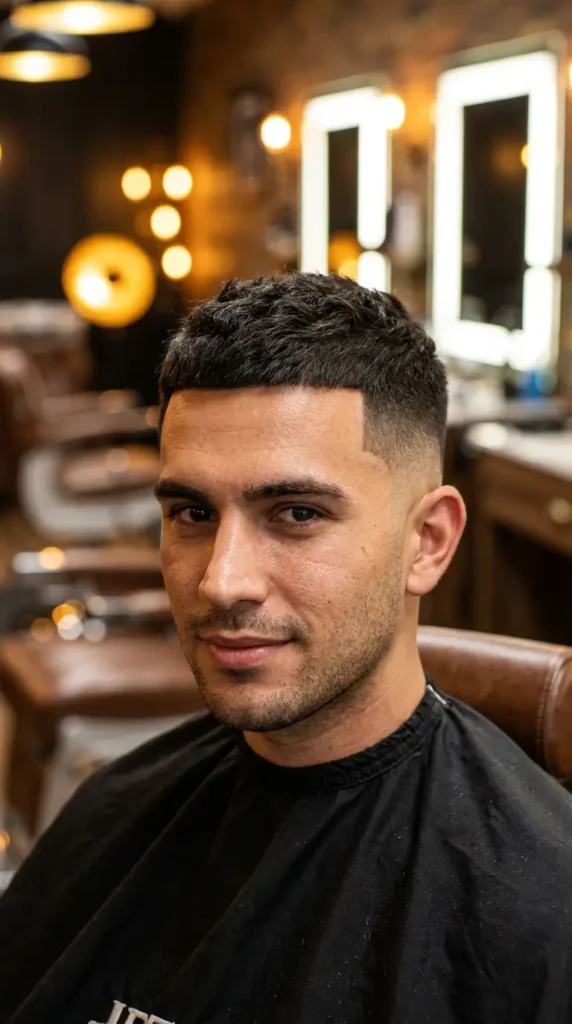
24. Mid Fade with Textured Top
The mid fade starts its gradient at the temple line. It is less dramatic than a high fade but still creates clear contrast between the faded sides and the textured top. For thinning hair, this provides a balanced, everyday look that is appropriate for both professional and casual settings.
What you need: 1.5–3 inches on top with texture, mid fade on sides Thinning pattern: Crown thinning, early diffuse thinning Face shape: All; versatile and universally professional Styling: Matte clay or texture powder for lift and definition Maintenance: Trim every 3–4 weeks
25. Modern Comb Over
The modern comb over (not the dated version that sweeps long strands across bald patches) uses medium-length hair on top combed smoothly to one side with a natural or hard part. For a more comprehensive look at this style, see our guide on comb over fade. For thinning hair, the directional sweep concentrates strands together. When hair moves uniformly in one direction, it compresses and looks thicker.
Why it works for thinning hair: Unidirectional styling prevents strand separation. The concentrated side creates a mass of hair that reads as full. A hard part adds structure that makes the style look intentional.
What you need: 2–4 inches on top, fade on sides, natural or hard part Thinning pattern: Diffuse thinning, mild crown thinning Face shape: All; professional and polished Styling: Blow-dry to one side, finish with lightweight pomade Maintenance: Trim every 4–5 weeks
Critical Note: There is a difference between a modern comb over (short-to-medium hair swept to one side with a fade) and the outdated comb-over (long wispy strands desperately draped across a bald scalp). The modern version works. The old version does the opposite; it draws maximum attention to hair loss.
26. Scissor Cut with Natural Layers
The scissor cut uses scissors only (no clippers) to create soft, natural-looking layers that blend into each other without harsh lines or obvious graduation. For more about how layering works for men, see our layered haircuts for men guide. For thinning hair, the soft layering creates movement and visual depth without the sharp contrasts that clipper cuts produce.
Why it works for thinning hair: Scissors create softer transitions between lengths, meaning the eye moves smoothly across the style without detecting stark density differences. The gentle texture camouflages thinning naturally.
What you need: 2–4 inches throughout, scissors-only cutting, no clipper use Thinning pattern: Early thinning, diffuse thinning where a softer look is preferred Face shape: All, particularly good in professional environments Styling: Blow-dry with fingers for lift, light volumizing mousse for body Maintenance: Trim every 5–6 weeks
27. Regulation Cut
The regulation cut features a clearly defined part with short, combed-flat hair and very short sides. It is military-influenced and extremely structured. For more military-inspired options, explore our full list of military haircuts for men. For thinning hair, the short length and flat styling minimizes any opportunity for scalp to show, while the clean lines make the cut look disciplined and intentional.
What you need: 1–2 inches on top, combed flat with clear part, tapered sides Thinning pattern: Diffuse thinning, overall density reduction Face shape: Oval and square (the structure complements angular features) Styling: Small amount of pomade, combed into flat, polished shape Maintenance: Trim every 3–4 weeks
28. Long Fringe with Short Sides
The long fringe extends the front section to 3–4 inches, falling forward across the forehead and partially over the eyes, while the back and sides stay short. For thinning hair focused at the hairline, this creates deliberate coverage that hides recession entirely behind a curtain of textured hair.
What you need: 3–4 inches at front, short sides and back Thinning pattern: Receding hairline, temple recession, Norwood 2–3 Face shape: Heart and oblong (shortens and frames the face) Styling: Blow-dry forward, texture powder for lift, finger-shape the fringe Maintenance: Trim every 4–5 weeks
29. Brush Up
The brush up directs all top hair straight upward from the scalp, like a quiff but less swept back and more directly vertical. For thinning hair, the pure vertical direction makes every single strand visible and contributing to the overall silhouette, creating maximum height with minimum density.
What you need: 2–3 inches on top, tight sides Thinning pattern: Crown thinning, early diffuse thinning Face shape: Round (adds significant vertical elongation) Styling: Blow-dry straight up, strong-hold matte clay to maintain vertical position Maintenance: Trim every 4 weeks
30. Messy Textured Medium Cut
The messy textured medium cut keeps 2–4 inches throughout the top with choppy, multi-directional pieces styled in different directions. The intentional mess creates visual complexity that disguises thin areas within the overall texture.
What you need: 2–4 inches on top, varied layering, shorter sides Thinning pattern: Diffuse thinning, early crown thinning Face shape: All (suits relaxed personal styles) Styling: Texture clay worked through in random directions Maintenance: Trim every 5–6 weeks
31. Business Cut

The business cut keeps everything short, neat, and professional: slightly longer on top (1–2 inches) with clean tapered sides and no dramatic fade or texture. For thinning hair, the conservative length prevents exposure while the clean proportions look polished in corporate environments.
What you need: 1–2 inches on top, neatly tapered sides Thinning pattern: All stages where hair still exists Face shape: All (maximally professional and conservative) Styling: Minimal: light styling cream brushed to the side Maintenance: Trim every 3–4 weeks
32. Taper Fade with Textured Top
The taper fade gradually reduces the side length without going to skin. It is softer and more conservative than a skin fade. For a deeper comparison of taper and fade techniques, see our taper vs fade guide. For thinning hair, the gentle taper provides contrast between sides and top without the dramatic bare-skin effect, making it appropriate for professional settings.
What you need: 2–3 inches on top with texture, graduated taper on sides Thinning pattern: Early-to-moderate thinning, crown area Face shape: All, particularly suited to professional environments Styling: Matte clay for texture, finger-shaped Maintenance: Trim every 4–5 weeks
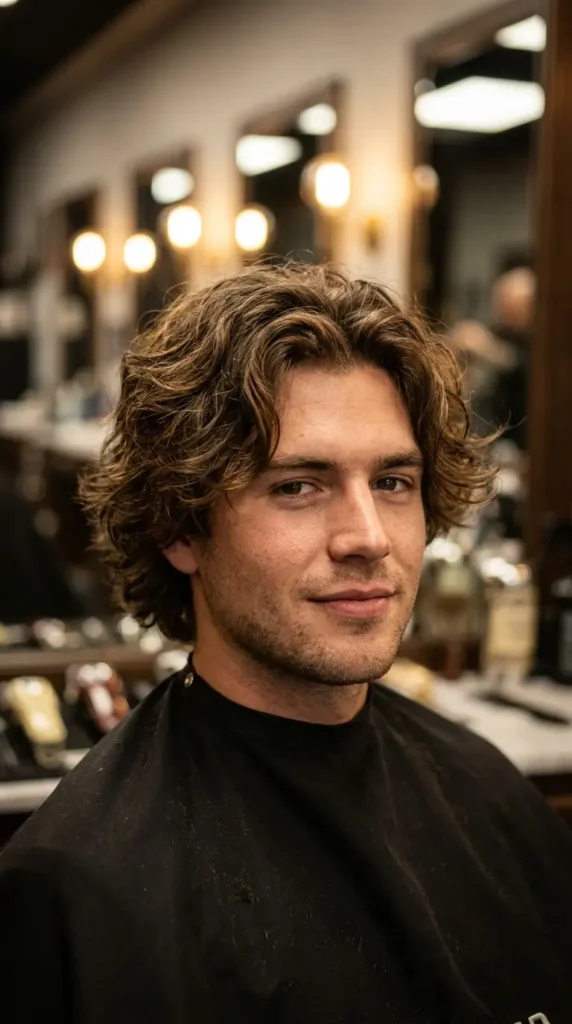
33. Curly Fringe (For Men with Natural Curl)
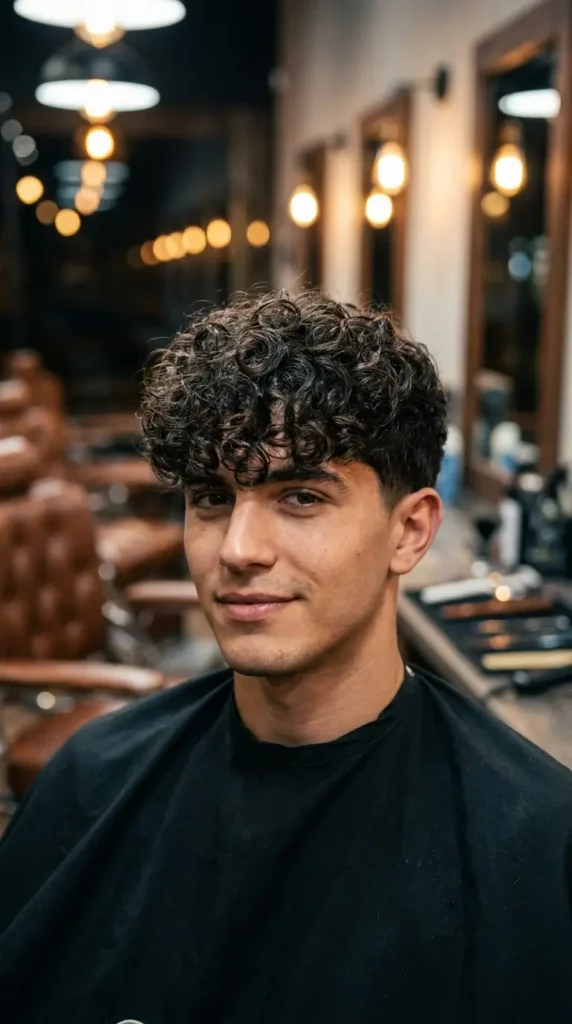
The curly fringe lets natural curls or waves fall forward over the forehead. For thinning men with curly hair, the curl pattern creates natural volume and coverage that straight hair cannot achieve; each curl occupies more space and hides more scalp per strand.
Why it works for thinning hair: Curly hair has a built-in volume advantage. Each curve or spiral takes up more visual space than a straight strand. Curls overlapping at the forehead create dense-looking coverage with fewer actual hairs.
What you need: 2–4 inches of curly hair on top, defined curls at front Thinning pattern: Receding hairline with curly texture Face shape: All, particularly flattering for longer faces Styling: Lightweight curl cream, shaped forward with fingers, air dry or diffuse Maintenance: Trim every 5–6 weeks
34. Mop Top
The mop top uses medium-length layers that fall naturally forward over the forehead and slightly over the ears. For thinning hair with adequate remaining density, the overlapping forward-falling layers create coverage across the top and front simultaneously.
What you need: 3–4 inches throughout, soft choppy layers falling naturally forward Thinning pattern: Early thinning only (Norwood 2–3); requires decent density to work Face shape: Oval, round Styling: Molding paste worked through, finger-shaped into position Maintenance: Trim every 5–6 weeks
35. High and Tight
The high and tight is a military classic: very short on top (#2–#4 guard) with the sides and back shaved close to the skin from the parietal ridge down. For thinning hair, this creates an intentionally aggressive style where short sides are the deliberate design; any thinning on top blends into the overall short aesthetic.
What you need: #2–#4 guard on top, #0 or skin on sides Thinning pattern: All stages, particularly good for advanced thinning (Norwood 4+) Face shape: Square and oval (strong features complement the bold style) Styling: Zero effort required Maintenance: Trim every 2–3 weeks
36. Short Pompadour
The short pompadour is a scaled-down version: only 2–3 inches on top rather than the full 4–5+ inches. For thinning hair, this provides enough lift to add volume without requiring the density needed for a dramatic full pompadour.
What you need: 2–3 inches on top, fade on sides Thinning pattern: Early thinning, mild crown thinning Face shape: Round, square Styling: Blow-dry upward, light texture powder, shape with fingers Maintenance: Trim every 4–5 weeks
37. Soft Fade with Natural Texture
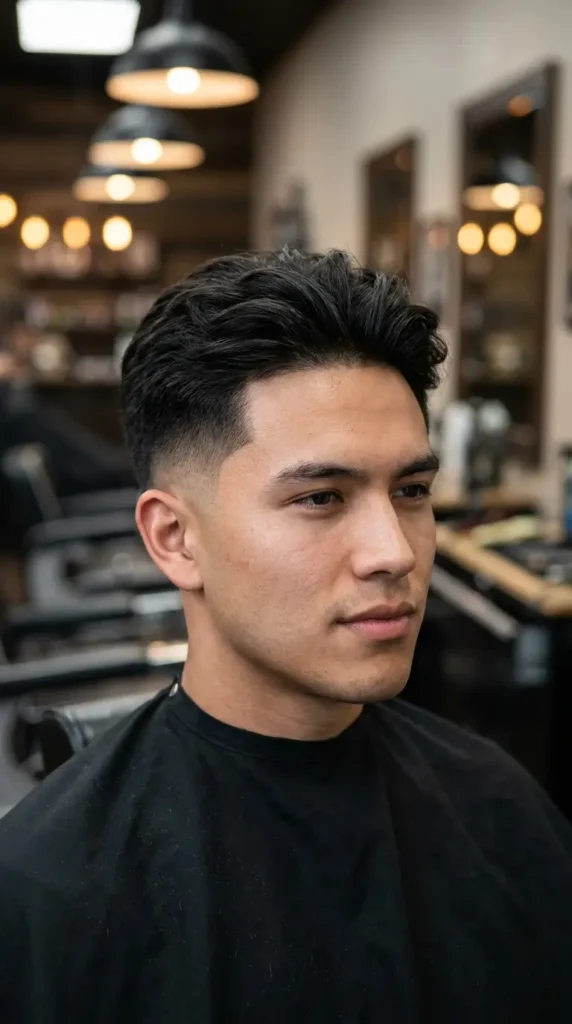
The soft fade uses a gentle, less aggressive gradient on the sides paired with whatever natural texture exists on top, whether that is straight, wavy, or slightly curly. No heavy product, no dramatic styling; the hair sits in its natural state but with clean, structured sides.
What you need: 2–3 inches on top left natural, soft taper/fade on sides Thinning pattern: Early-to-moderate thinning where hair still has natural movement Face shape: All Styling: Minimal: light styling cream for control, or no product Maintenance: Trim every 4–5 weeks
How Male Pattern Baldness Works
Male pattern baldness follows a predictable biological process:
- DHT (dihydrotestosterone), a hormone converted from testosterone, attaches to hair follicles
- The affected follicles gradually miniaturize: they shrink, producing thinner and shorter strands with each growth cycle
- Eventually, miniaturized follicles stop producing visible hair entirely
- This process is genetic, inherited from either parent’s side
The rate of progression varies enormously. Some men notice thinning in their early 20s. Others maintain full density until their 50s.
The Norwood Scale: Where Are You?
The Norwood Scale is the standard classification system dermatologists and trichologists use to measure male pattern hair loss progression:
| Norwood Stage | Description | What It Looks Like |
|---|---|---|
| Stage 1 | No visible hair loss | Full head of hair |
| Stage 2 | Slight recession at temples | “Mature hairline” that is natural and age-appropriate |
| Stage 3 | Noticeable temple recession or early crown thinning | Visible M-shaped hairline or small crown spot |
| Stage 4 | Significant recession + crown thinning | Distinct bald spot at crown, deeper temple recession |
| Stage 5 | Large bald area, crown and temples connecting | Bridge of hair between front and crown narrowing |
| Stage 6–7 | Extensive hair loss | Only a horseshoe band remaining at sides and back |
Key Point: Your Norwood stage determines which haircut strategies work best. A style that works brilliantly at Stage 2 may look unnatural at Stage 5. This guide provides recommendations for each stage.
Why the Right Haircut Matters More Than Anything Else
Before considering any treatment (minoxidil, finasteride, hair fibers, or transplants), the single most impactful change you can make for thinning hair is choosing the correct haircut. Here is why:
The problem with thinning hair is visual contrast. When remaining hair is too long, it separates and exposes the scalp beneath. The eye immediately detects the color difference between hair strands and visible scalp; this is what makes thinning look obvious.
The right haircut works by:
- Reducing the length so strands stay close together rather than separating
- Adding texture so hair creates optical density through movement and layering
- Keeping sides shorter than the top to eliminate comparison between thin and thick areas
- Creating strategic coverage in specific thinning zones (fringe forward for hairline, texture at crown)
- Removing excess weight that pulls thin hair flat against the scalp
Tip: Think of it this way: a lawn looks full when grass is kept short and uniform. The same lawn looks sparse and patchy when grass grows long and falls over. Your hair works the same way.
How to Choose the Right Haircut for Your Thinning Pattern
Not all thinning is the same. Where you are losing hair determines which cuts will work and which will make it worse. Here is a precise matching guide:
By Thinning Area
| Thinning Pattern | Best Strategy | Recommended Styles |
|---|---|---|
| Temple recession (receding hairline) | Forward-falling fringe or textured front to camouflage hairline | French crop, textured fringe, angular fringe, Caesar cut |
| Crown thinning (vertex/top of head) | Short textured top that adds lift and reduces scalp visibility | Textured crop, crew cut, short quiff, buzz cut |
| Diffuse thinning (overall reduction everywhere) | Short, uniform lengths with maximum texture for even density appearance | Buzz cut, crew cut, short textured crop, Caesar cut |
| Frontal thinning (hairline + front third) | Fringe styles that bring hair forward across the thin zone | French crop, choppy fringe, long fringe, mop top |
| Combination (temples + crown simultaneously) | Short all over with fade and texture | Buzz cut with fade, short crew cut, high-and-tight |
If your thinning is primarily at the temples and hairline, you may also want to explore our dedicated guide on hairstyles for receding hairline for additional options.
By Face Shape
| Face Shape | Thinning Hair Concern | Best Cut Strategy |
|---|---|---|
| Oval | Most versatile; any cut works | Any recommended style |
| Round | Needs height on top to elongate | Quiff, pompadour, textured crop with lift |
| Square | Soften angular jawline | Soft fade, textured top, side-swept styles |
| Oblong/Long | Avoid adding excessive height | Fringe styles, crew cut, Caesar cut (keep top shorter) |
| Heart | Balance wider forehead with narrower jaw | Fringe coverage, French crop, textured forward styles |
| Diamond | Complement wide cheekbones | Side part, slick back, comb over |
For men with round faces specifically, our complete guide on hairstyles for round heads and chubby faces provides 55+ options that create a slimming effect.
Key Point: The biggest mistake men with thinning hair make is growing their hair LONGER to “cover” thin areas. This does the opposite: it exposes more scalp by separating strands, making thinning dramatically more visible. Shorter, textured cuts are almost always the better choice.
Haircuts to Avoid with Thinning Hair
Knowing what NOT to do is equally important. These styles make thinning hair look worse:
| Style to Avoid | Why It Makes Thinning Worse |
|---|---|
| Long hair (4+ inches lying flat) | Separates under its own weight, exposing scalp between strands |
| Center part | Opens a visible line directly down the middle where thinning is most exposed |
| Traditional comb-over (long strands across bald patch) | Draws maximum attention to the area you are trying to hide, the opposite of camouflage |
| Tight slicked-back styles | Pulls hair away from hairline, revealing recession; product compresses strands flat against scalp |
| Very long sides | Creates comparison between thick sides and thin top, making the top look even thinner |
| Heavy product saturation (gel, oil-based pomade) | Clumps strands together and weighs them against the scalp, making hair look sparse and wet |
| Man bun with thinning | Traction from pulling hair back accelerates hairline recession; thin gathered hair reveals scalp |
Key Point: The single biggest mistake is growing hair longer to “cover” thin areas. Long thin hair separates and exposes more scalp than short textured hair EVER would. Counterintuitive as it sounds, going shorter almost always makes thinning look BETTER, not worse.
What to Tell Your Barber
Walking into the barbershop knowing exactly what to say eliminates miscommunication and ensures you leave with a cut that works FOR your thinning rather than against it.
The 5-Part Communication Script for Thinning Hair
1. Name the concern directly: “I have thinning at my [crown / temples / hairline / overall] and I want a cut that makes it look fuller.”
2. Request the technique: “I want texture and layers on top rather than blunt, flat cutting. Can you point-cut the top for movement?”
3. Specify the sides: “Keep the sides short (a fade, taper, or #2 guard) so the top looks thicker by comparison.”
4. Mention what to avoid: “I do NOT want it long enough to lie flat and separate. Keep it short enough that strands stay together.”
5. Bring reference photos: Save 3–5 images on your phone of the specific style you want. Show the barber from FRONT and SIDE angles.
Additional Phrases That Help:
- “Add texture with point-cutting rather than blunt cutting”
- “I want it to look fuller, not longer”
- “Can you use thinning shears on any areas that are too heavy, so it blends with the thinner zones?”
- “Keep enough length at the front to frame my hairline”
- “I’d like it to work WITHOUT heavy product, lightweight texture only”
Tip: Do not be embarrassed to mention thinning. Barbers work with thinning hair every single day; it is one of the most common requests they receive. A good barber will have specific techniques and recommendations ready. If your barber dismisses the concern or does not adapt their approach, find a new barber.
How to Style Thinning Hair for Maximum Fullness
The right haircut is 70% of the equation. The other 30% is how you style it daily. These techniques make the biggest difference:
1. Blow-Dry Upward at the Roots
This is the single most effective volume technique for thin hair. Direct warm air upward from the scalp while lifting hair at the roots with your fingers or a vented brush. This trains the hair to stand away from the scalp rather than lying flat against it.
How to do it:
- Start with towel-dried (damp) hair
- Hold blow dryer 6 inches from head, pointing upward
- Lift sections with fingers while directing air at the root area
- Spend 60–90 seconds lifting the crown and front areas
- The heat “sets” the lift; once dry, the volume stays
2. Blow-Dry Against the Growth Pattern
For extra volume, occasionally blow-dry in the OPPOSITE direction of how your hair naturally falls. This creates root lift by pushing hair against its natural grain. Then, style it back into place; the root lift remains even after you redirect the hair.
3. Use Lightweight, Matte-Finish Products Only
Heavy products (gel, oil-based pomade, wax) compress thin hair against the scalp and make strands clump together, exposing the scalp beneath clumped sections. Lightweight matte products add hold and texture without weight.
Products to USE:
- Texture powder (best option, literally zero weight)
- Matte clay (small amounts only)
- Sea salt spray (pre-styling volume booster)
- Volumizing mousse (apply before blow-drying)
- Light styling cream (small amounts for direction)
Products to AVOID:
- Heavy gel (makes hair look wet and flat)
- Oil-based pomade (weighs hair down, creates clumping)
- Heavy wax (makes hair stiff and compressed)
- Anything that creates a “wet look” (exposes scalp by compressing strands)
4. Apply Product to Roots, Not Ends
Most men apply product to their fingers and then run through the full length of their hair. For thinning hair, apply product at the ROOT area first; this is where lift originates. Applying heavy product to the ends weighs down the tips and pulls the hair flat.
5. Part Strategically
Where you part your hair directly affects how much scalp is visible:
- Side part (not center): concentrates hair on one side for more density
- No part at all: textured styles that avoid a visible part line expose less scalp
- Avoid center parts: these create a visible scalp line running through the thinnest area
6. Product Layering Technique (Maximum Volume Method)
For the fullest possible result, layer products in this sequence:
- Sea salt spray on damp hair (creates grip and base texture)
- Blow-dry upward at roots for 60–90 seconds (sets volume)
- Texture powder sprinkled at roots (adds invisible lift and thickness)
- Finger-shape into final position (defines the style)
This layering method produces significantly more volume than any single product alone.
Top Products That Enhance Haircuts for Men with Thin Hair
| Product Type | What It Does | Best For | How to Use |
|---|---|---|---|
| Texture Powder | Adds instant volume and grip at roots with zero visible residue | All thinning hair; the #1 recommended product | Sprinkle at roots, massage in |
| Sea Salt Spray | Creates natural texture, body, and grip on damp hair | Pre-styling volume base, wavy/messy styles | Spray on damp hair before blow-drying |
| Matte Clay | Provides medium-strong hold with zero shine, adds texture | Textured crops, spiky styles, quiffs | Apply pea-sized amount to dry hair |
| Volumizing Mousse | Creates lightweight volume and body throughout | Pompadours, quiffs, blow-dried styles | Distribute through damp hair before blow-drying |
| Fiber Paste | Gives flexible, natural hold with slight texture | Messy styles, natural movement | Work through damp or dry hair |
| Lightweight Styling Cream | Adds soft direction and control without weight | Side parts, swept styles, professional looks | Small amount through damp hair |
| Molding Paste | Provides pliable texture and definition | Fringe styles, textured crops | Work through with fingers |
| Dry Shampoo | Absorbs oil and adds volume between washes | Day 2–3 hair that looks flat | Spray at roots, wait 30 seconds, massage |
| Thickening Spray | Coats individual strands with polymers that swell and thicken each hair | All thinning hair; use as a base layer | Spray on damp hair before styling |
Tip: The golden rule for thinning hair products is this: if you can SEE the product in your hair (shine, wet look, visible residue), you are using the wrong type or too much. Thinning hair products should be invisible. The hair should look like your natural hair, just fuller.
Maintenance Schedule for Thinning Hair
Keeping thinning hair looking its best requires a specific maintenance routine:
Barber Visit Frequency
| Cut Type | Recommended Frequency | Why |
|---|---|---|
| Buzz cut / High and tight | Every 2–3 weeks | Very short cuts show growth quickly |
| Crew cut / Textured crop | Every 3–4 weeks | Maintains texture definition |
| Quiff / Pompadour / Side part | Every 4–5 weeks | Slightly longer styles grow out gracefully |
| Medium styles (bro flow, shag) | Every 6–8 weeks | Longer styles need less frequent shaping |
Daily Scalp Health Routine
A healthy scalp supports stronger, thicker remaining hair:
- Wash with gentle shampoo 3–4 times per week (not daily; over-washing strips natural oils)
- Use conditioner every wash to keep strands flexible and prevent breakage
- Massage scalp for 1–2 minutes during washing; this improves blood circulation to hair follicles
- Avoid very hot water on the scalp; heat can weaken follicles
- Use a clarifying shampoo once every 2 weeks to remove product buildup that weighs hair down
Protecting Remaining Hair
- Never pull hair back tightly: traction alopecia (hair loss from pulling) is preventable
- Minimize heat exposure: always use a heat protectant before blow-drying
- Sleep on a silk pillowcase: reduces friction and breakage on delicate thin strands
- Avoid brushing aggressively: use a wide-tooth comb on damp hair, never a fine-tooth comb pulled through dry thin hair
Treatment Options That Complement the Right Haircut
The right haircut is the most immediately impactful change. But for men who want to address the underlying thinning (not just style around it), these treatments can be used alongside your chosen cut:
| Treatment | What It Does | Timeline | Considerations |
|---|---|---|---|
| Minoxidil (Rogaine) | Stimulates blood flow to follicles, extends growth phase | Results visible in 3–6 months | Over-the-counter; must use continuously |
| Finasteride (Propecia) | Blocks DHT production to slow/stop miniaturization | Results in 6–12 months | Prescription only; discuss side effects with doctor |
| Hair Fibers (Toppik, Caboki) | Cosmetic keratin fibers that cling to existing hair, creating instant density | Immediate visual result | Temporary; washes out; best for special occasions |
| PRP Therapy | Injecting platelet-rich plasma into scalp to stimulate follicle activity | 3–6 months for results | Performed by dermatologist; multiple sessions needed |
| Scalp Micropigmentation | Tattooed dots mimicking hair follicles on the scalp | Immediate (after sessions) | Permanent/semi-permanent cosmetic option |
| Hair Transplant | Surgically moving follicles from donor area to thinning zones | 12–18 months for full result | Expensive; permanent; requires adequate donor area |
Key Point: None of these treatments replace the need for the right haircut. Even men using minoxidil, finasteride, or post-transplant still benefit from haircuts designed to maximize the APPEARANCE of the hair they have. The two approaches (treatment + strategic cutting) work together.
Hair Color Strategies for Thinning Hair
Color plays a significant role in how visible thinning appears, and most guides completely ignore this:
The Contrast Problem
Thinning becomes most visible when there is high contrast between hair color and scalp color. Dark hair on light skin shows scalp dramatically. The greater the contrast, the more obvious thinning appears.
Color Strategies That Help:
| Strategy | How It Works | Best For |
|---|---|---|
| Going slightly lighter | Reduces contrast between hair and scalp | Dark-haired men with light scalps |
| Adding highlights | Creates multi-tonal depth that disguises scalp showing through | All hair colors |
| Embracing gray | Gray/silver is naturally closer to scalp color, which reduces contrast | Men over 40 going gray |
| Avoiding jet black dye | Pure black against any scalp creates maximum visible contrast | Men who dye their hair dark |
| Matte products over shiny | Shiny products reflect light and expose scalp; matte absorbs light | All thinning hair; daily product choice |
Tip: If you are considering dyeing your hair, go one shade LIGHTER than your natural color rather than darker. Lighter shades reduce the contrast with your scalp, making thinning less detectable. Going darker does the opposite.
Celebrity Inspiration: Famous Men Who Style Thinning Hair Well
| Celebrity | Thinning Pattern | How They Style It | Takeaway |
|---|---|---|---|
| Jude Law | Receding hairline + crown thinning | Short textured styles, sometimes buzzed | Proves thinning men look great short and textured |
| Jason Statham | Advanced overall thinning | Buzz cut / shaved with confidence | Owning the buzz cut is powerful; facial hair adds balance |
| David Beckham | Temple recession + thinning crown | Textured crop, buzz cut, varied short styles | Adapts his cut to match his current thinning stage |
| Prince William | Crown thinning, Norwood 4+ | Very short buzz, sometimes slightly longer on top | Demonstrates that embracing short over covering is the right call at advanced stages |
| Ryan Reynolds | Mild temple recession | Textured side part with shorter sides | Shows how directional styling creates the illusion of full density |
| Matthew McConaughey | Once visibly thinning, now fuller | Short-to-medium textured styles | Example of combining treatment + strategic cutting |
| LeBron James | Frontal recession, hairline thinning | Short buzz, sometimes with line-up | High-profile example of adapting style to current reality |
| Chris Hemsworth | Mild thinning noticed at crown | Textured medium styles, forward direction | Uses length strategically to cover early thinning with natural texture |
Conclusion
Thinning hair does not limit your style options; it simply changes the strategy. The core principle behind every haircut in this guide is the same: shorter, textured cuts keep strands close together, eliminate the contrast between thick and thin zones, and make the hair you have work harder. A textured crop, French crop, or crew cut will serve most men well, while a buzz cut or high fade becomes the confident choice as thinning advances.
Start by identifying your thinning pattern (temples, crown, or diffuse) and your Norwood stage, then match it to the recommended styles above. Take reference photos to your barber, use the communication script from this guide, and stick to lightweight matte products with a quick blow-dry at the roots. Combine the right cut with consistent maintenance every 3–5 weeks, and thinning hair becomes practically invisible in daily life.
Remember: the men who look best with thinning hair are not the ones hiding it. They are the ones who chose a cut that works with it. Pick your style, own it, and book that barber appointment.
Frequently Asked Questions
What is the best haircut for thinning hair?
Short, textured cuts like a textured crop, crew cut, or French crop are the best haircuts for thinning hair because they add volume through choppy layering while keeping hair short enough that strands stay together rather than separating and exposing the scalp. The texture creates the optical illusion of more hair per square inch.
How can I make thin hair look thicker?
Making thin hair look thicker requires 3 simultaneous approaches: (1) a short textured haircut that keeps strands close together, (2) blow-drying upward at the roots to create lift, and (3) using lightweight matte-finish products like texture powder or sea salt spray that add volume without compressing hair against the scalp.
What haircut is best for a thinning crown?
For a thinning crown specifically, short textured styles that add lift directly at the crown area work best, including a textured crop, short quiff, faux hawk, or crew cut with texture. These styles direct hair upward and toward the center-top, creating coverage precisely where crown thinning is most visible.
Is a fade good for thinning hair?
A fade is excellent for thinning hair because it removes the visual comparison between thick sides and thin top. When the sides are faded short intentionally, the eye has no “full hair” reference point to compare against the thinner top, making the top appear adequate rather than thin.
What should I tell my barber about thinning hair?
Tell your barber: “I have thinning at my [specific area] and I want a cut that adds texture and volume on top with shorter sides. Please use point-cutting for texture rather than blunt cutting, and keep it short enough that strands don’t separate and show scalp.”
What hairstyles make thinning hair look worse?
Long flat styles, center parts, heavy slicked-back looks, and traditional comb-overs make thinning hair look worse because they separate strands under their own weight, compress hair against the scalp, or deliberately draw attention to the thinnest areas. Avoid any style that requires heavy product or pulls hair away from the hairline.
Are short haircuts better for thinning hair?
Short haircuts are almost always better for thinning hair because they keep strands close together (preventing scalp-exposing separation), create uniform density (no contrast between thick and thin zones), and reduce the weight that pulls thin hair flat against the scalp.
Does blow-drying help thinning hair look fuller?
Blow-drying is the most effective free styling technique for thinning hair. Directing warm air upward at the roots lifts hair away from the scalp, creating volume and the appearance of more density. The heat sets this lift in place; without heat, thin hair often falls flat within minutes of styling.
What products add the most volume to thin hair?
Texture powder adds the most volume per gram of any styling product because it creates lift directly at the roots with literally zero weight. Sea salt spray (applied to damp hair before blow-drying) provides the best pre-styling volume base. Volumizing mousse adds lightweight body throughout.
Can thin hair grow back thicker?
Thin hair caused by male pattern baldness (androgenetic alopecia) will not grow back thicker on its own because the hair follicles have permanently miniaturized. However, treatments like minoxidil and finasteride can slow further loss and may partially restore some miniaturized follicles to producing thicker strands. Good nutrition (protein, biotin, iron, zinc, vitamin D) and scalp care support the health of remaining hair.
How often should I get a haircut with thinning hair?
Men with thinning hair should visit their barber every 3–5 weeks depending on the style. Shorter cuts (buzz, crew cut) need trimming every 2–3 weeks. Medium textured styles last 4–5 weeks. Keeping cuts fresh prevents thin hair from growing to lengths where it separates and exposes scalp.
Should men with thinning hair grow a beard?
A beard can significantly benefit men with thinning hair by redistributing visual weight from the head to the jaw. When the top of the head has less hair, facial hair adds masculine balance below. Stubble, short beards, or full beards all work; the key is that facial hair adds presence that compensates for reduced hair density above.
Is thinning hair the same as balding?
Thinning hair is the transitional stage before balding: hair density is reduced but hair still exists. Balding refers to areas where hair has completely stopped growing. Most men spend years or decades in the thinning stage before (if ever) progressing to complete baldness. The right haircut and care can make thinning look virtually invisible throughout this entire period.
What causes thinning hair in men?
The primary cause is genetics, specifically the sensitivity of hair follicles to DHT (dihydrotestosterone), which causes follicle miniaturization. Additional factors include aging, stress (which can trigger telogen effluvium), poor nutrition (insufficient protein, iron, biotin, zinc), thyroid conditions, medication side effects, and harsh styling habits that cause physical breakage.
Does wearing a hat make thinning worse?
Wearing a hat does NOT cause or accelerate thinning hair. This is a myth. Hair loss is caused by genetics and hormones (DHT), not by external pressure from hats. However, very tight hats worn constantly can cause traction alopecia (loss from pulling) at the hairline edges, so avoid extremely tight headwear.
How do I hide thinning hair as a man?
The most effective way to hide thinning hair is going shorter, not longer. Choose a textured crop, buzz cut, or Caesar cut that keeps strands close together so scalp cannot show through gaps. Camouflage the specific thin area: a forward fringe covers a receding hairline, while a textured crop with lift covers crown thinning. Combine this with lightweight texture powder applied at the roots and avoid heavy, shiny products that expose the scalp underneath.
What haircut is best for a skinny or slim build?
For men with a slimmer build, haircuts that add width and structure at the top balance out a narrower frame, similar to how they work for thinning hair. A textured crop, crew cut, or quiff with volume on top creates visual proportion without looking bulky. Avoid very long, flat styles that can make a slim frame look disproportionately narrow. Pairing the cut with a well-groomed beard also adds visual weight and balance.