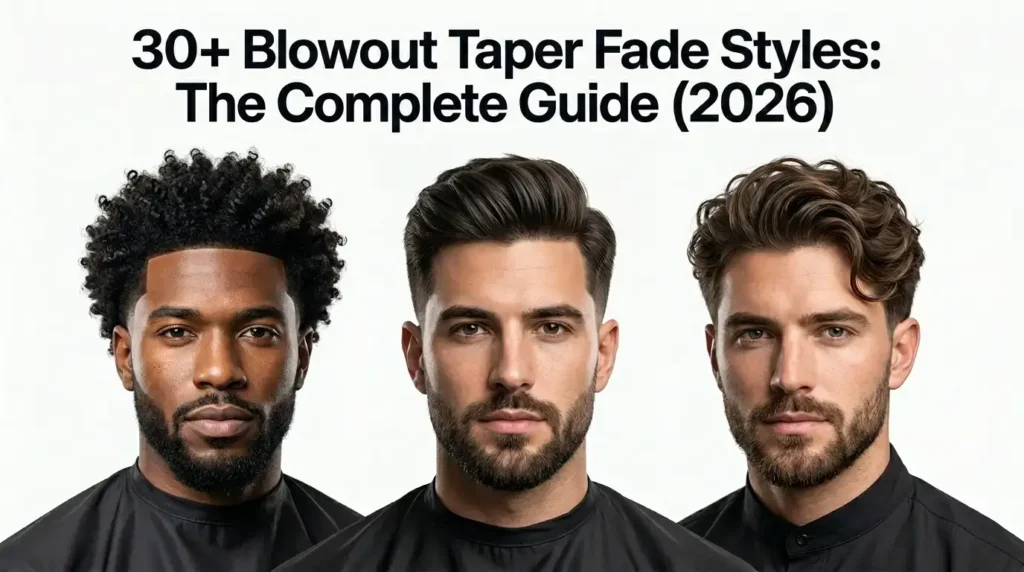
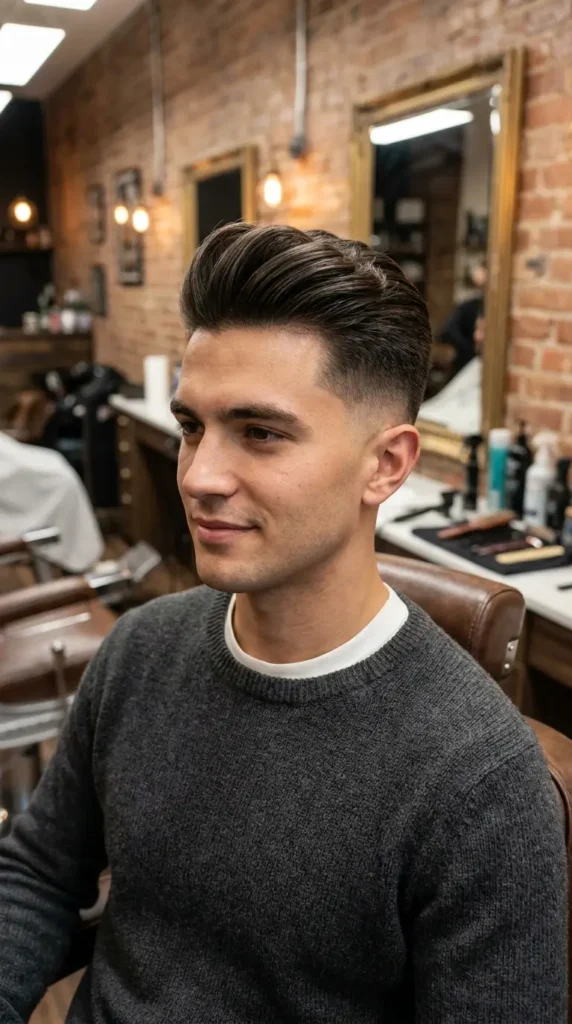
A blowout taper fade is a men’s haircut that combines a gradual taper or fade on the sides and back with a voluminous, blow-dried top styled upward and outward for height, texture, and movement. Three distinct barbering techniques — tapering, fading, and blow-dry styling — merge into one unified look that delivers clean sides with a full, lifted crown.
This haircut suits every hair type. Curly, wavy, straight, afro-textured, thick, and fine hair all respond well to the blowout taper when styled with the right technique and products. The cut works across all face shapes because barbers can independently adjust three variables: fade height, top length, and volume direction.
The blowout taper fade became one of the most-requested men’s haircuts in barbershops across the USA and globally from 2024 onwards, overtaking the textured crop and mullet in appointment demand. Whether you want a subtle, lived-in style or a bold, high-contrast look, this guide covers every variation, hair type, face shape, product, and technique you need.
What Is a Blowout Taper Fade?
The blowout taper fade consists of three layered techniques working together:
1. The Taper
A taper gradually reduces hair length from the top down towards the sides, back, neckline, and around the ears. Unlike a fade, a taper does not necessarily go down to skin level. The hair gets progressively shorter but maintains some visible length at its shortest point. This creates a natural, conservative gradient that blends seamlessly into the skin without exposing the scalp fully.
2. The Fade
A fade takes the gradient further — blending hair all the way down to skin (skin fade) or near-skin level (shadow fade). The fade creates sharper contrast between the longer top and the shorter perimeter. Barbers build fades using clipper guards in sequence, moving from guard #0 (0.5mm) at the lowest point upward through guards #1, #1.5, #2, and #3 for seamless blending.
3. The Blowout
The blowout is a styling technique, not a cutting technique. After the taper or fade is cut, the barber uses a blow-dryer to lift hair at the root and direct it upward or outward. This creates volume, height, and directional movement on top. The result is a full, rounded silhouette that appears lifted and textured rather than flat against the scalp.
When these three techniques combine, you get a haircut with precise, clean sides that gradually fade shorter while the top maintains maximum volume and texture — the defining characteristics of the blowout taper fade.
Understanding the taper vs fade distinction is essential because it determines which variation your barber delivers and how the final result looks.
Key Point: A taper reduces hair gradually and may not reach skin level, whilst a fade blends completely down to the skin for higher contrast. Many modern blowout taper fades combine both — a taper in some zones and a fade in others — depending on the client’s preference.
Blowout Taper with Skin Fade — What Makes It Different
The blowout taper with skin fade takes the standard blowout taper and pushes the contrast to its maximum. Instead of the sides blending down to a short guard length (#1 or #0.5), the skin fade takes hair all the way down to bare skin at the lowest point — creating a sharp, dramatic gradient from nothing to full volume on top.
How It Differs from a Standard Blowout Taper
A regular blowout taper may leave visible hair at its shortest point — a soft shadow that never fully exposes the scalp. The skin fade version removes that shadow entirely. The result is a cleaner, bolder, higher-contrast look where the bare skin at the neckline and around the ears transitions seamlessly into the voluminous crown.
Guard progression for a skin fade blowout taper:
- Skin (no guard / foil shaver) at the neckline and perimeter
- Guard #0 (0.5mm) blending upward from the skin
- Guard #0.5 (1.5mm) bridging into the mid-zone
- Guard #1 through #2 transitioning into the top section
- Scissors on top — 2–6 inches depending on desired blowout length
Who It Suits Best
The skin fade version works particularly well for men with thick or dense hair. The extreme contrast between bare skin and full volume on top prevents the “mushroom” effect that thick hair can create with softer tapers. It also suits men with darker hair — the contrast between dark strands and exposed scalp creates a visually striking gradient.
Maintenance Reality
Skin fades grow out faster than shadow fades or standard tapers because the starting point is 0mm. Within 5–7 days, stubble becomes visible at the perimeter. Most men maintaining a skin fade blowout schedule touch-ups every 10–14 days rather than the 2–3 weeks a standard taper allows.
Scalp Care for Skin Fades
The skin fade creates more visual “real estate” of exposed scalp, so scalp care becomes important. Apply a lightweight moisturiser to the faded areas to prevent dryness, flaking, or irritation — especially during colder months when exposed skin is more vulnerable.
Key Point: The blowout taper with skin fade creates the highest possible contrast between sides and top. The bare skin at the perimeter graduates into full volume at the crown, producing a bold, modern look that requires touch-ups every 10–14 days to maintain sharpness.
Tip: If you choose the skin fade version, invest in a lightweight scalp moisturiser for the exposed areas. During winter months especially, the bare skin on a fresh skin fade can become dry and irritated without proper hydration.
How to ask your barber: “I want a blowout taper with a skin fade — take it to skin at the bottom, blend it seamlessly up through the sides, and keep full length and volume on top. Style it with a blowout finish.”
30+ Blowout Taper Fade Styles for Every Look
1. Low Blowout Taper Fade

The most subtle variation. Taper begins just above the ears and neckline only. Conservative, professional, and grows out gracefully over 3+ weeks. Best for round faces and corporate settings.
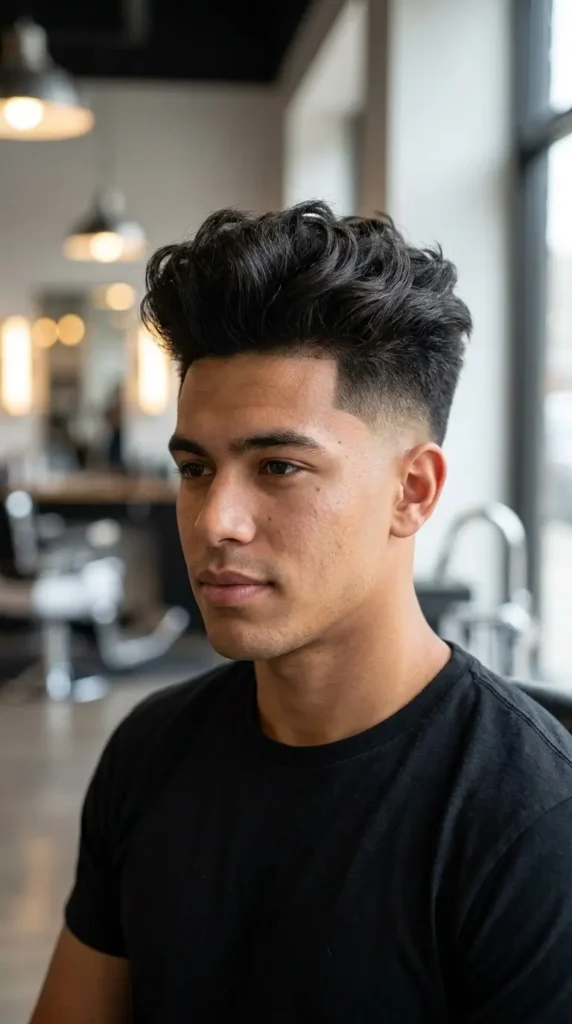
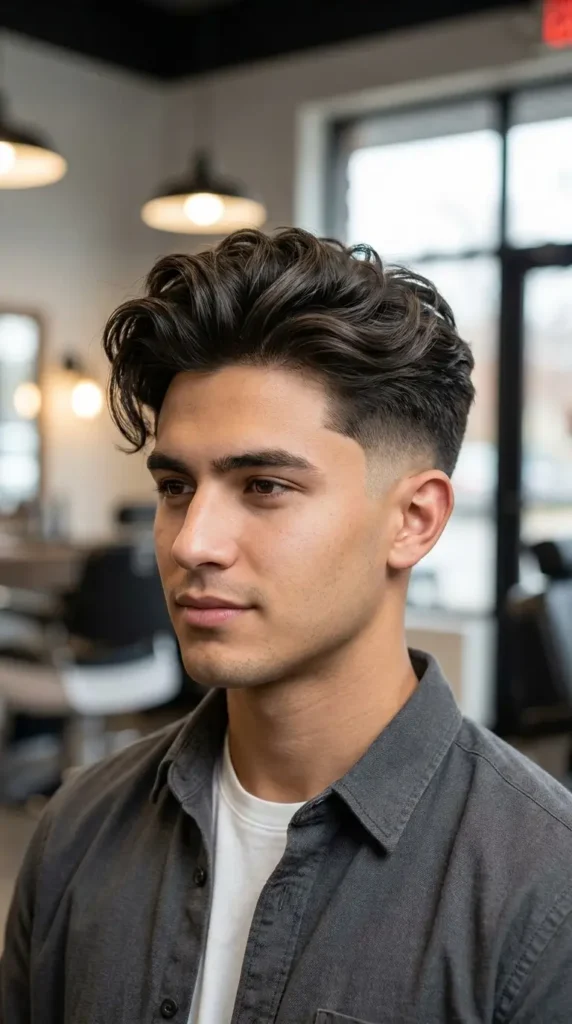
2. Mid Blowout Taper Fade

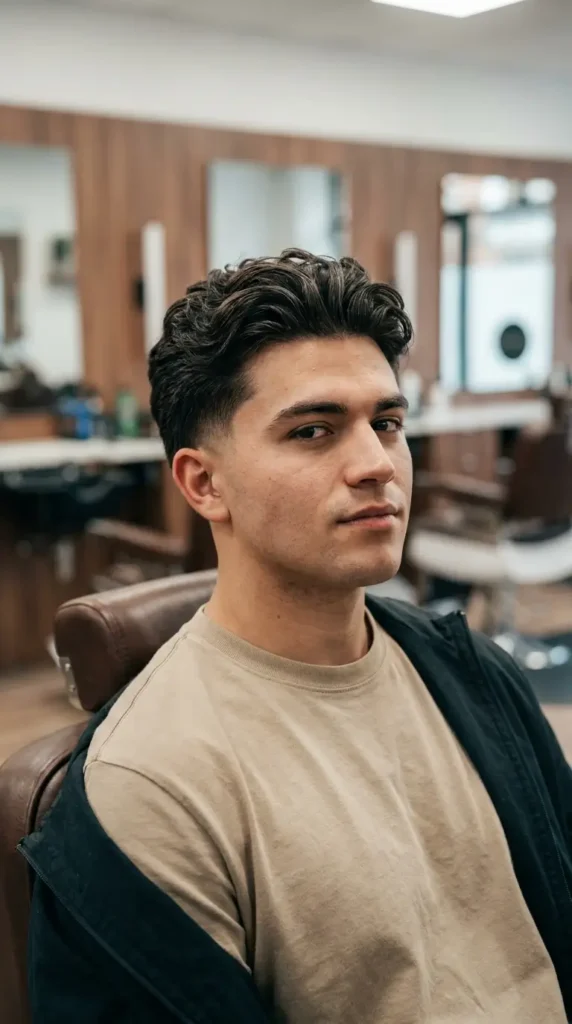
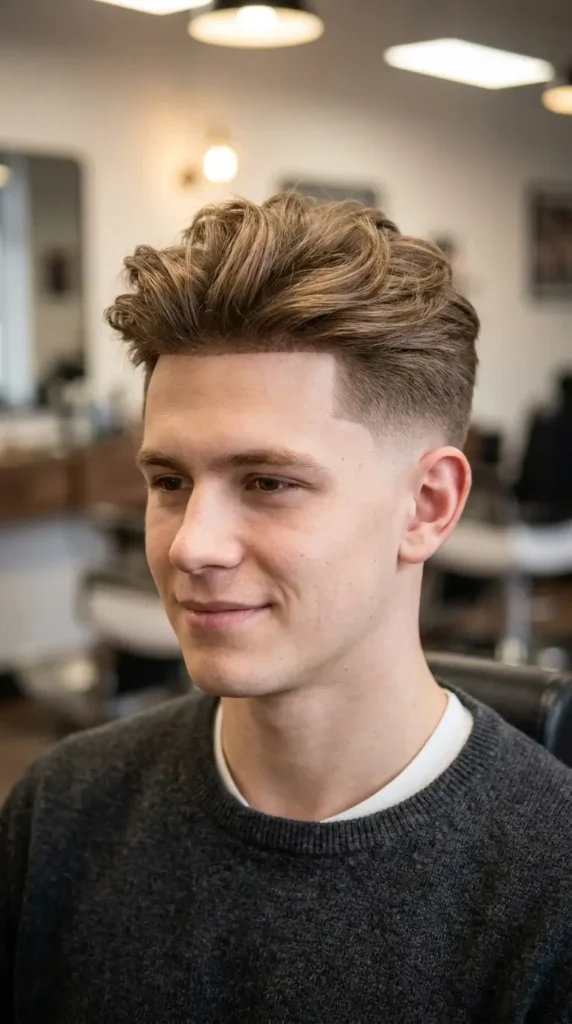
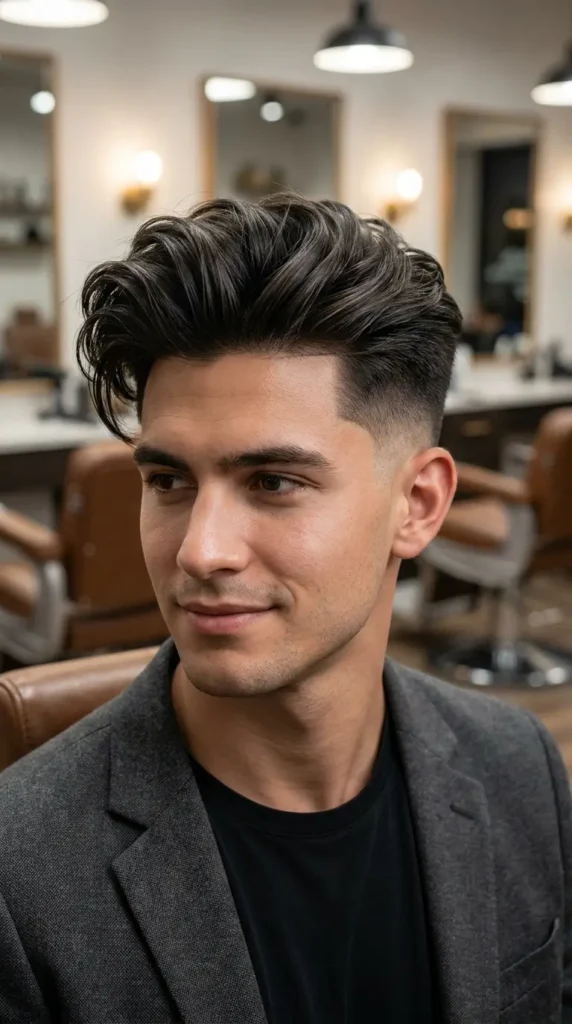
The most popular and versatile variation. Fade begins at ear level with balanced contrast between clean sides and voluminous top. Works on any face shape. The default recommendation for first-timers.
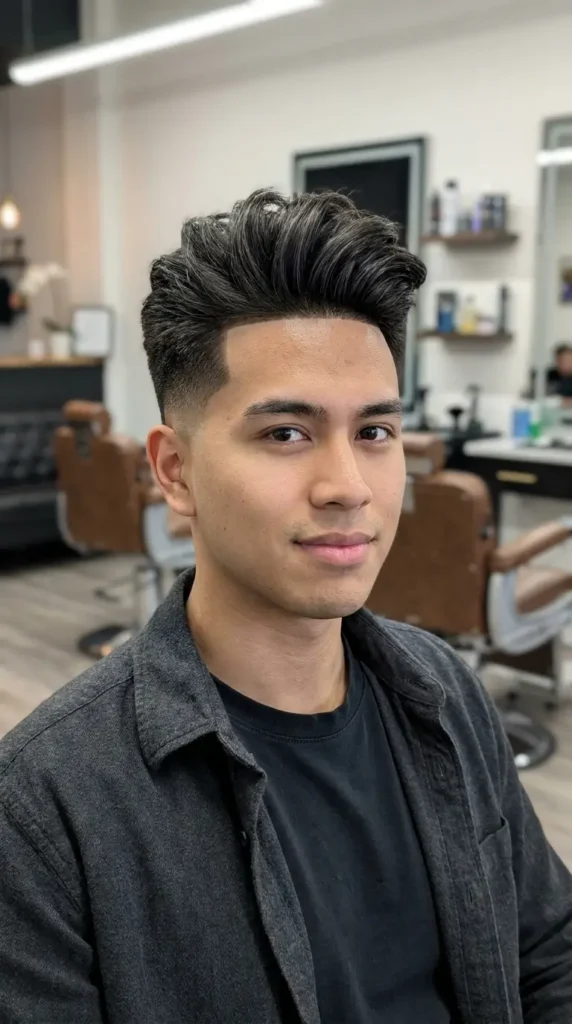
3. High Blowout Taper Fade

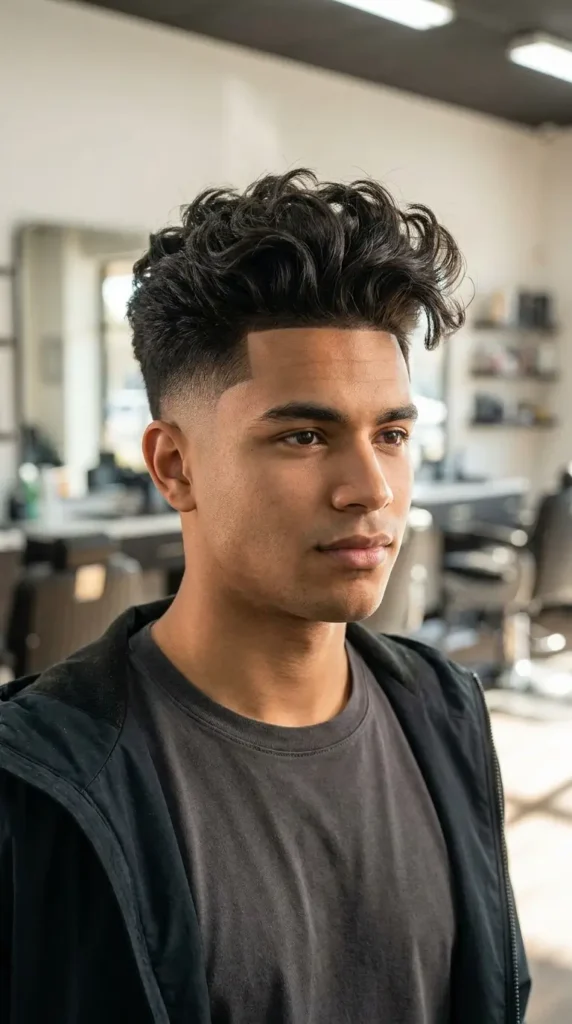
The boldest variation. Fade begins at or above the temple line for maximum contrast. Best for square faces. Requires touch-ups every 10–14 days due to faster visible grow-out.
4. Drop Fade Blowout Taper

The fade curves downward behind the ear following the skull’s natural contour, creating a smooth arc rather than a straight horizontal line. Best for men with smaller heads or those wanting an organic, non-linear fade shape.
5. Blowout Taper with Skin Fade

Maximum contrast version — sides taken to bare skin at the lowest point, graduating into full volume on top. Bold, modern, and high-maintenance (10–14 day touch-up cycle).
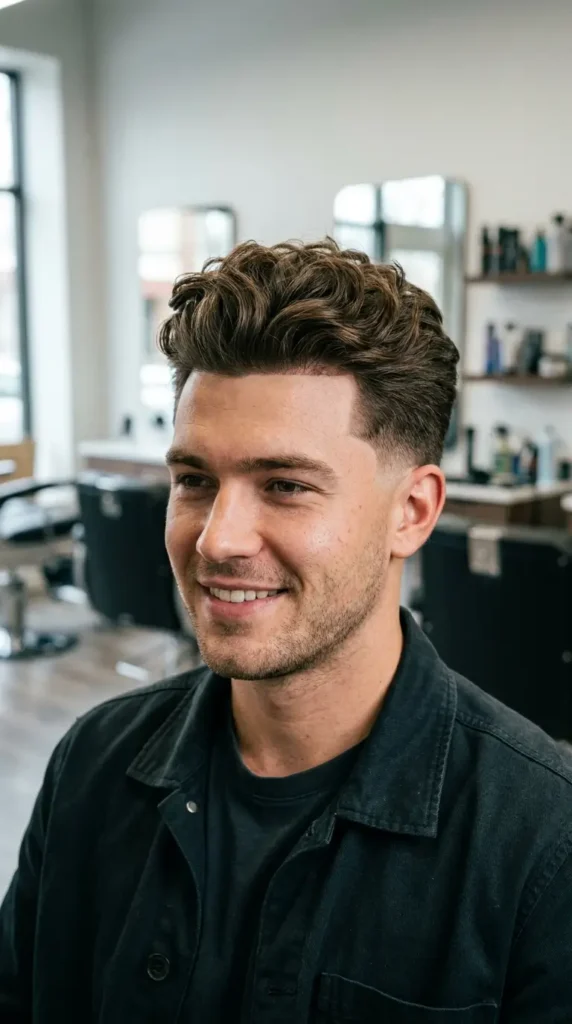
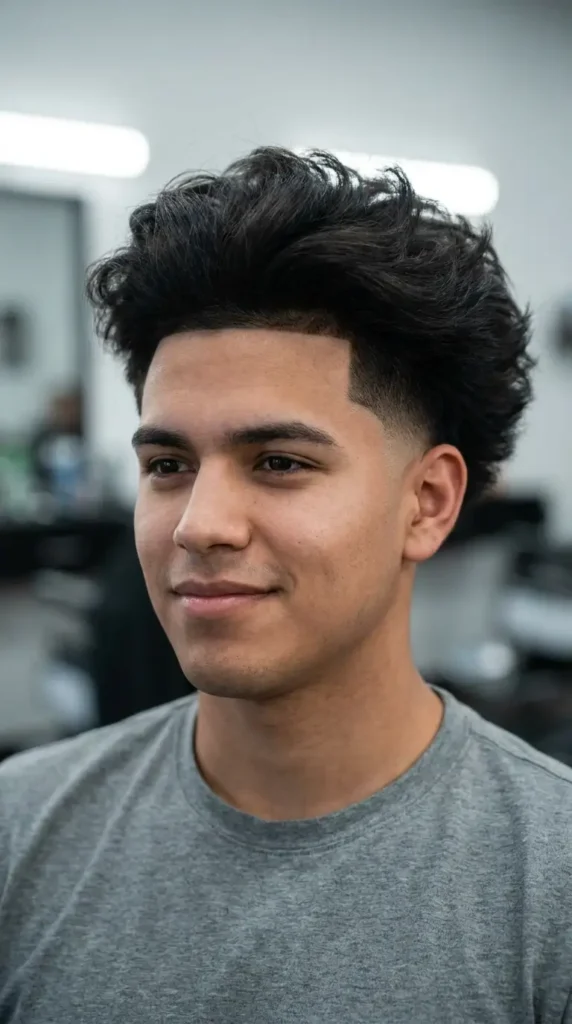
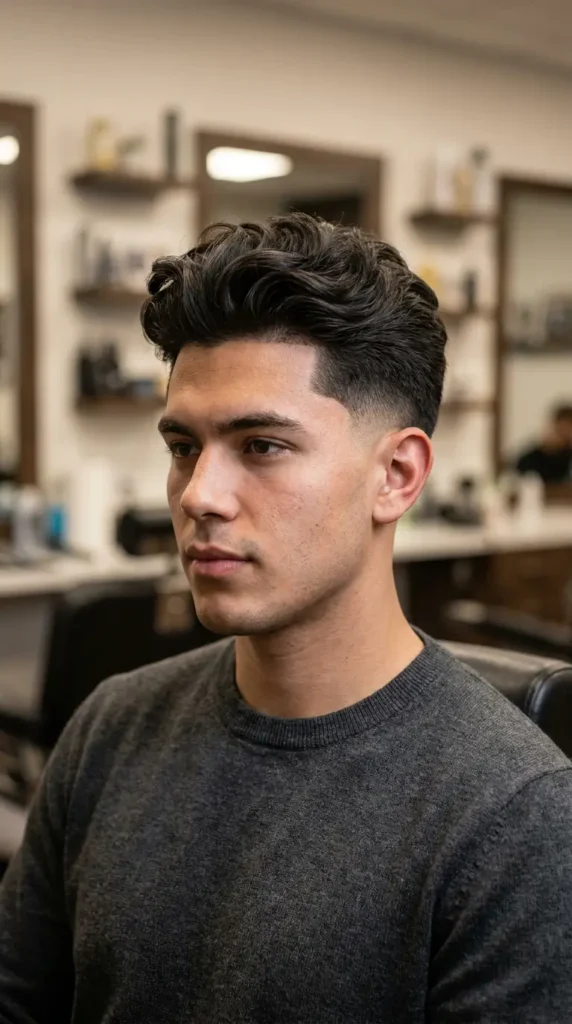
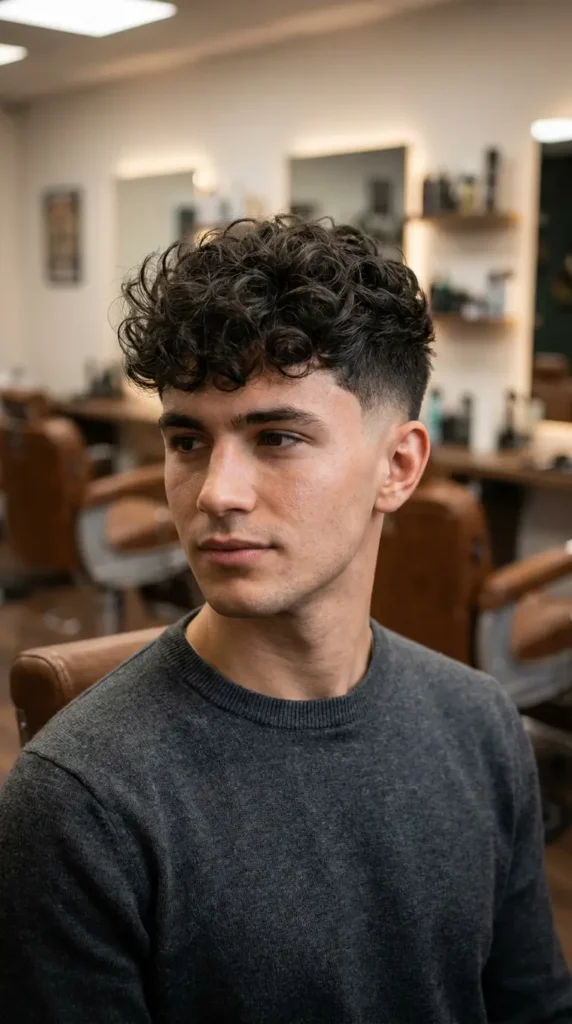
6. Curly Blowout Taper Fade

Natural coils hold the blowout shape effortlessly for 3–5 days. Styled with diffuser and curl cream. The most popular texture for this cut due to natural volume retention.
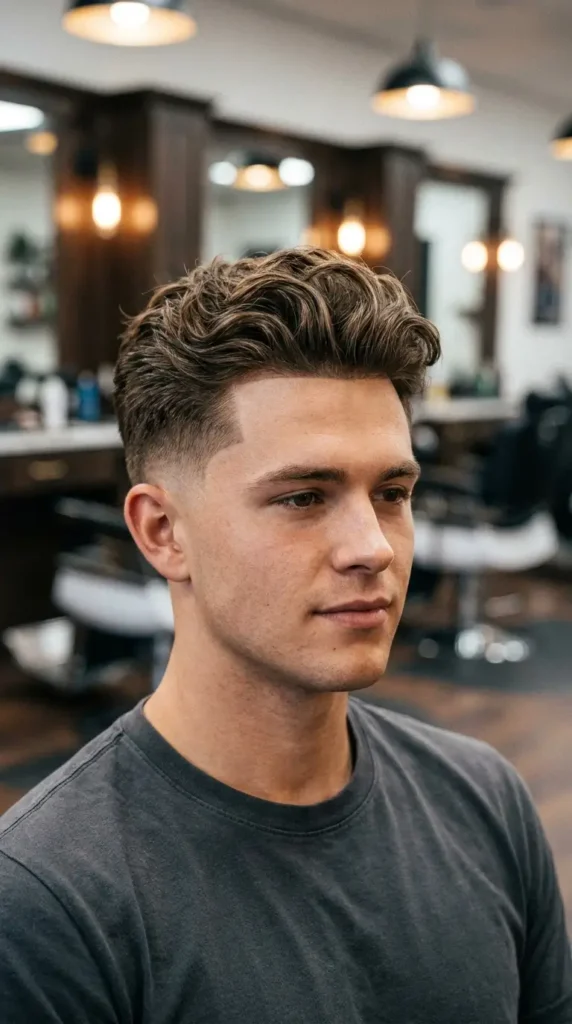
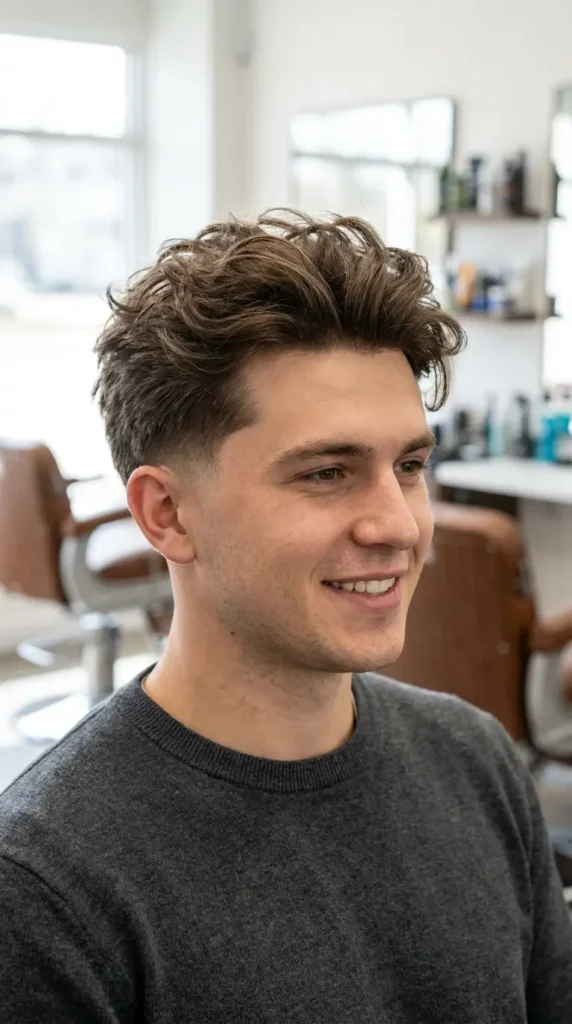
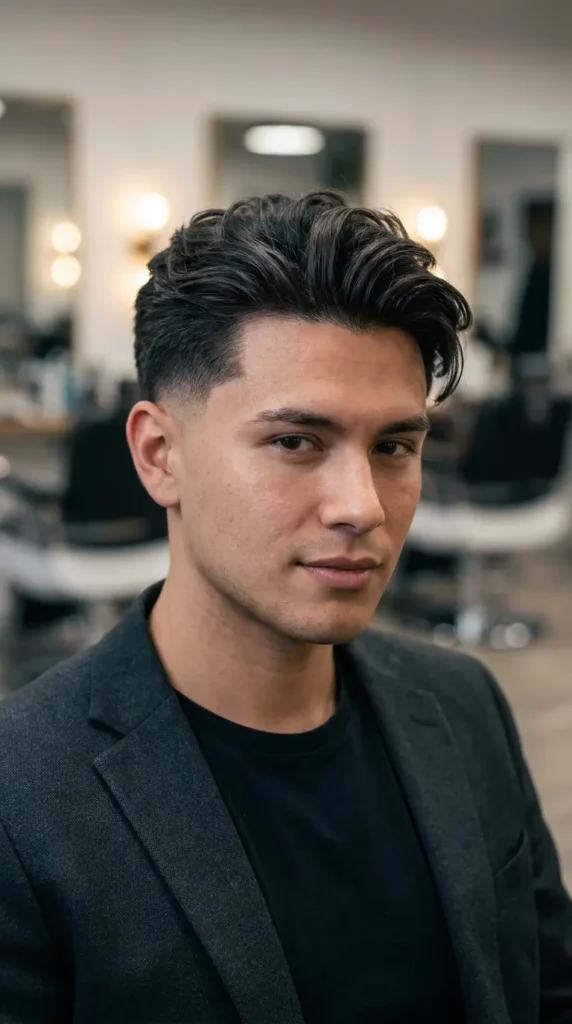
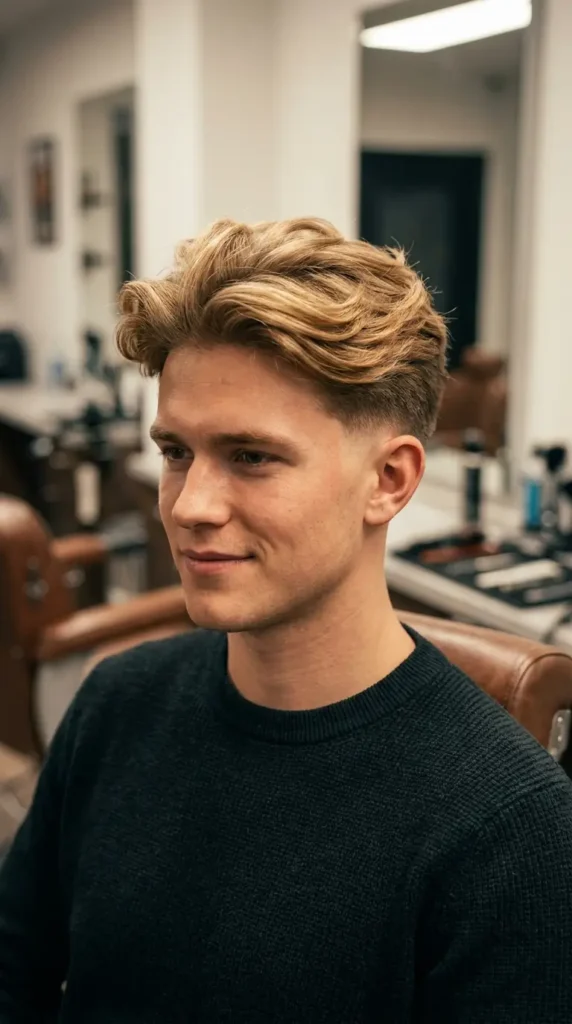
7. Wavy Blowout Taper Fade

Natural S-pattern creates relaxed movement and texture. Styled with sea salt spray and finger-dried at 70% before finishing with a blow-dryer. Best with low to mid taper heights.
8. Blowout Taper Fade for Straight Hair

Requires volumising mousse, concentrator nozzle, and blow-drying against growth direction. Texture powder after drying adds the grip and lift straight strands lack naturally.
9. Blowout Taper Fade for Asian Hair

Coarse, thick straight strands with round cross-section. Needs higher heat, stronger hold products (medium-hold clay), and more deliberate technique to hold directional styles throughout the day.
10. Thick Hair Blowout Taper Fade

Natural density creates effortless volume. Barber uses thinning shears or point cutting to remove internal weight and prevent the mushroom effect. Lighter products prevent weighing down.
11. Blowout Taper Fade for Thin Hair

One of the most flattering cuts for fine hair. Blow-dry technique creates 40–60% more perceived volume. Round brush at roots + volumising mousse + texture powder. Avoid heavy clays.
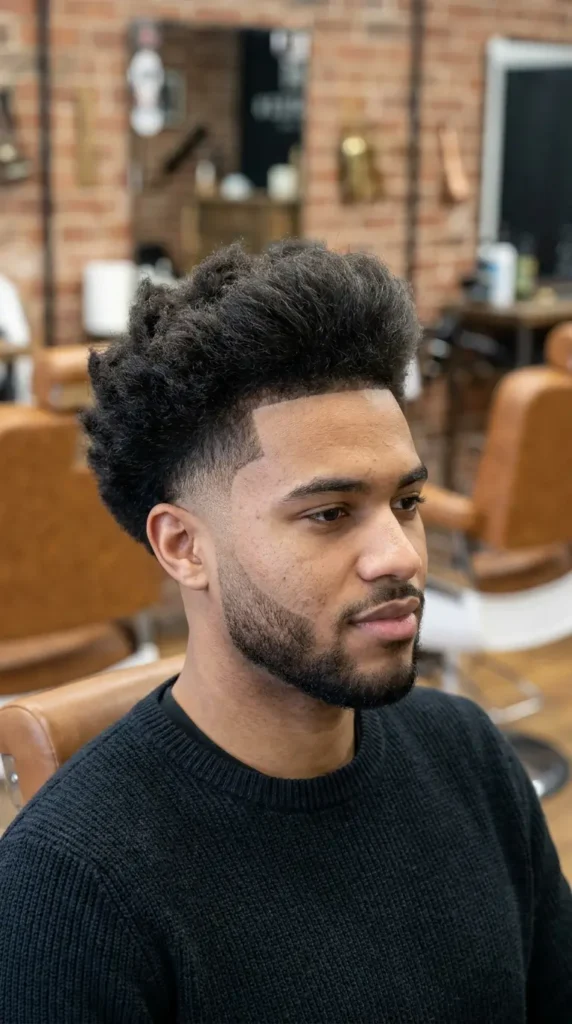
12. Afro Blowout Taper Fade

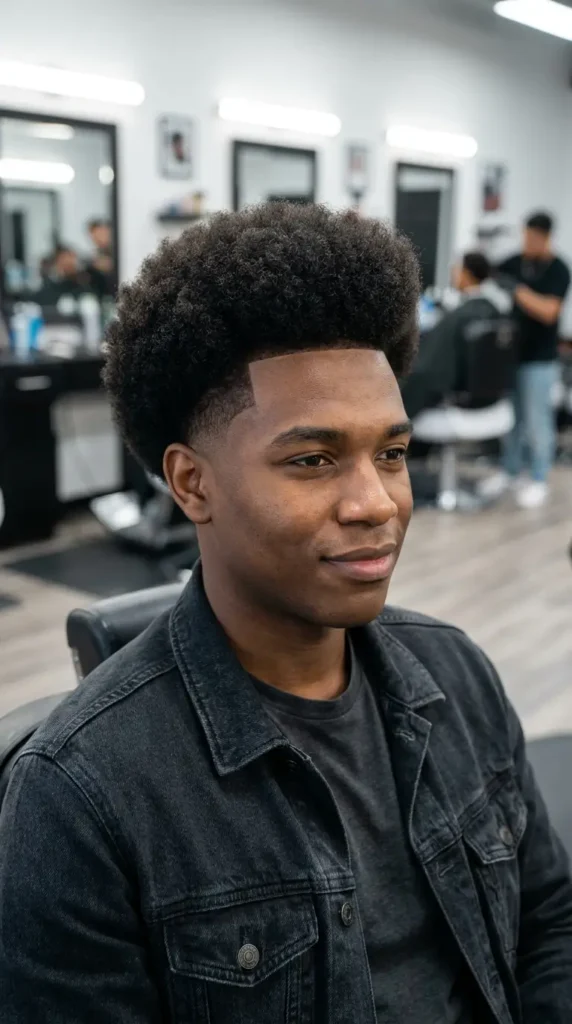
Tightly coiled hair holds rounded blowout shape perfectly. Styled with pick or blow-dryer with comb attachment. Sharp line-up with enhancement spray defines the shape dramatically.
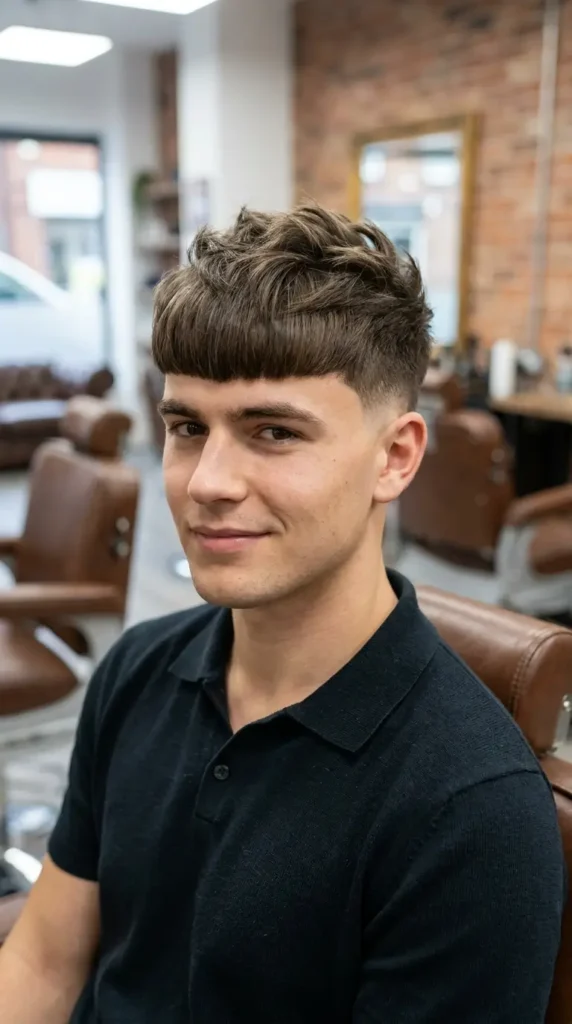
13. Textured Fringe Blowout Taper

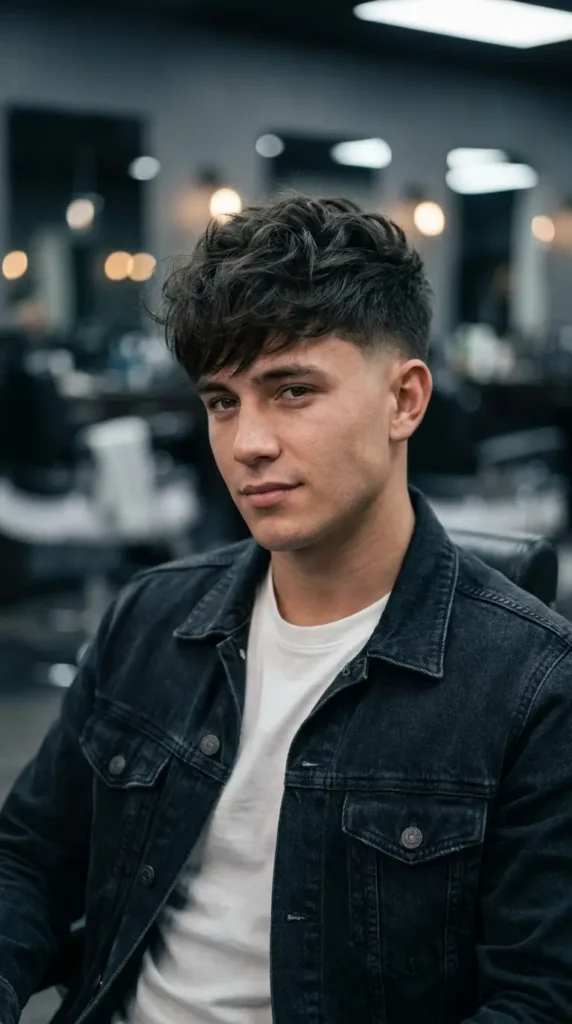
The most viral variation — forward-facing fringe with choppy, separated texture. The “TikTok haircut.” Blow-dried forward and slightly upward, finished with texture powder for separation.
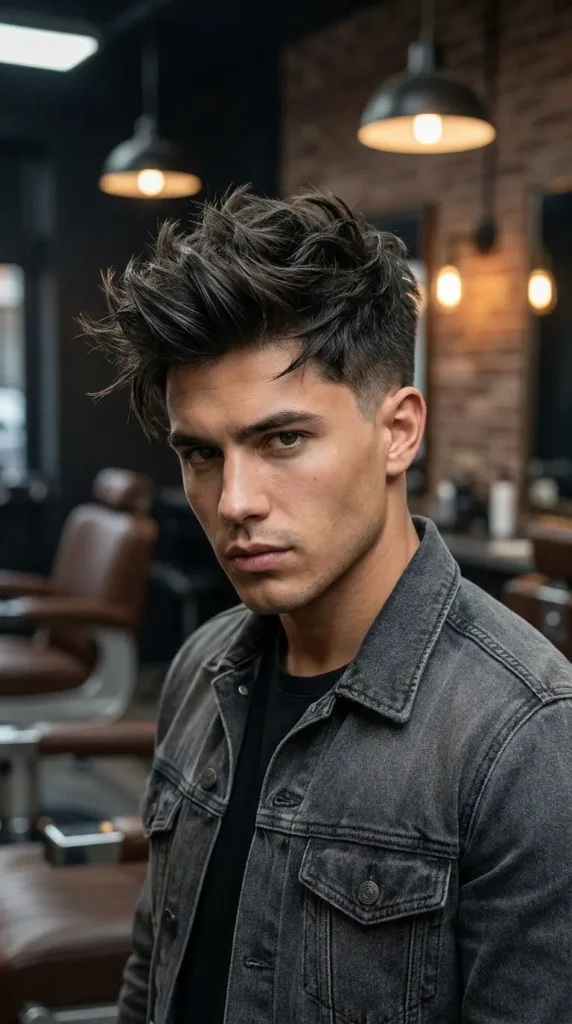
14. Messy Blowout Taper Fade

Intentionally undone texture on top contrasted against precise fade on sides. Blow-dried in multiple random directions. Sea salt spray + matte clay. Casual, youthful, effortless.
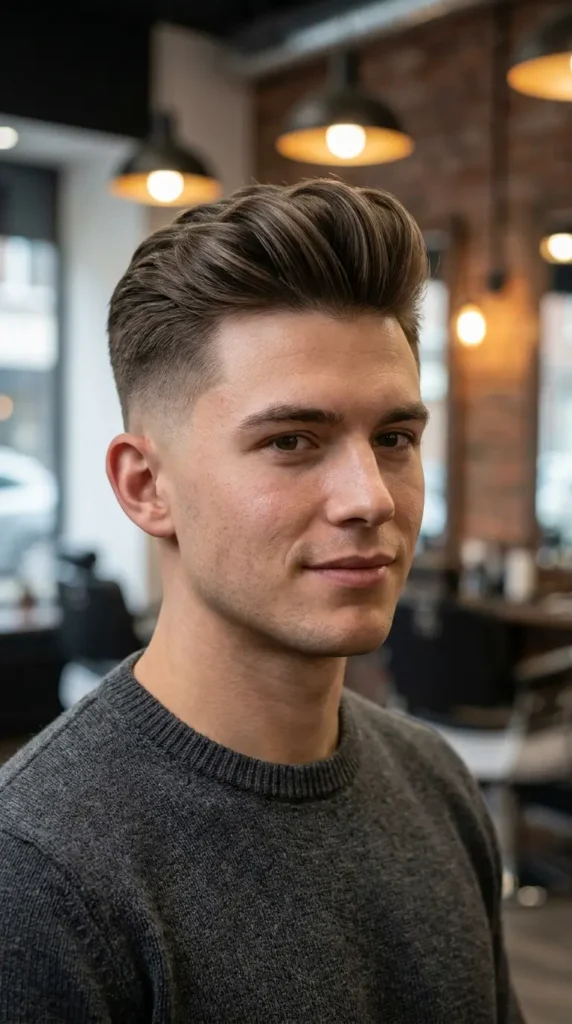
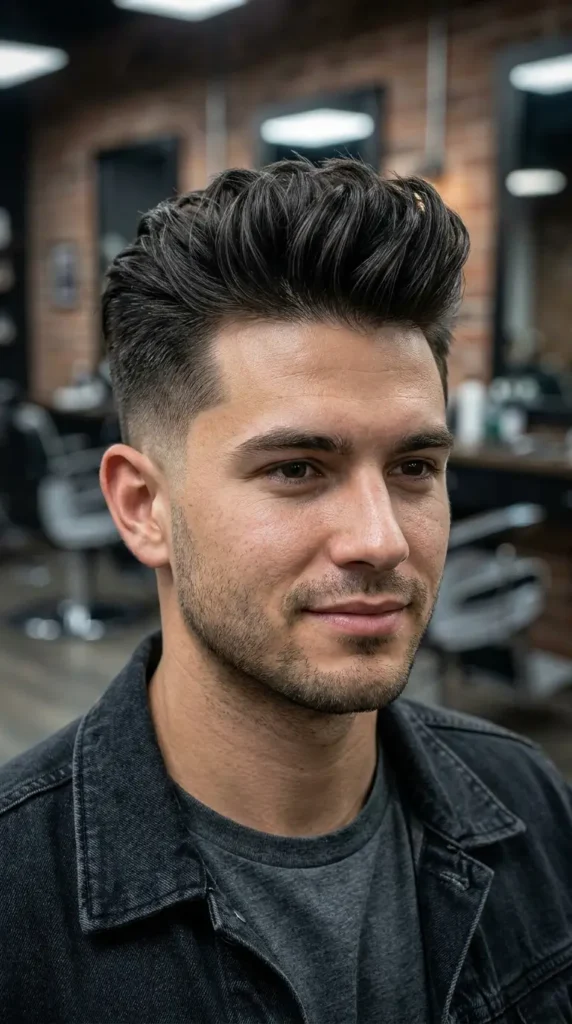
15. Clean Blowout Taper Fade

Polished and structured. Every strand directed with purpose. Blow-dried with round brush in one consistent direction. Professional, formal, mature. Light pomade or blow-dry cream finish.
16. Edgy Blowout Taper Fade

Incorporates design elements — hard parts, razor lines, geometric patterns, bleached sections. Maximum self-expression. For creative industries and fashion-forward individuals.
17. Fluffy Blowout Taper Fade

Soft, airy, cloud-like volume. Minimal product — volumising mousse only. Best on fine to medium density hair. Korean/K-pop influence. Gen Z aesthetic.
18. Modern Blowout Taper Fade

The current 2026 iteration — textured, asymmetrical, personalised to individual skull shape. What most barbers create as the default when you simply request a “blowout taper fade.”
19. Short Blowout Taper Fade (1–2 inches on top)

Minimal length, maximum fade contrast. Subtle volume. Low maintenance (2–3 minute styling). Best for active lifestyles and hot climates.
20. Long Hair Blowout Taper Fade (4–6+ inches on top)

Dramatic volume and maximum versatility. Can be styled as blowout, slicked back, or natural flow. Requires 8–12 minutes daily styling. Best on wavy and curly textures.
21. Blowout Taper Fade with Beard

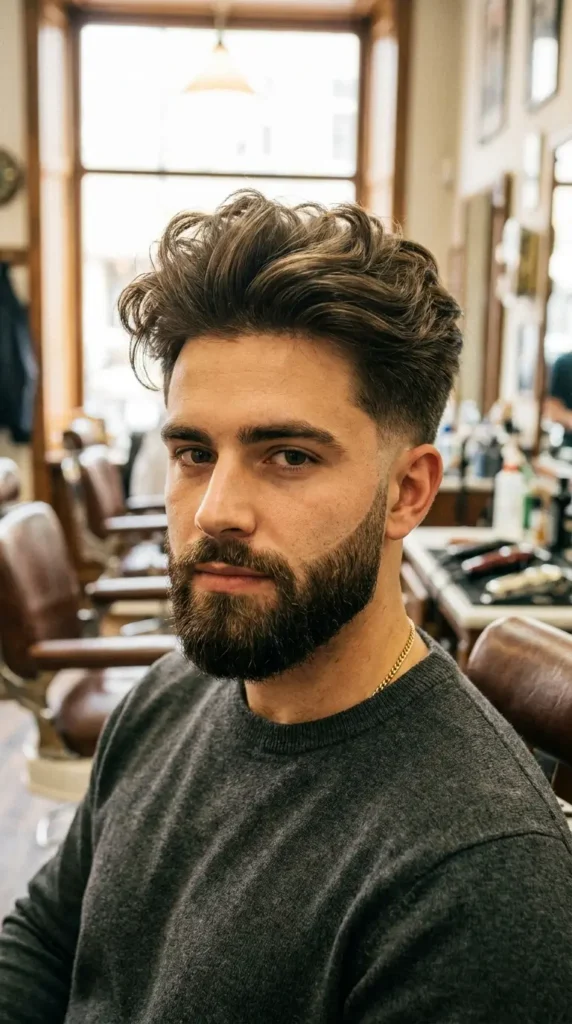
Taper blends seamlessly into facial hair along the cheekline. Low taper + full beard for masculine cohesion. Mid taper + short boxed beard for professional balance. High taper + stubble for modern contrast.
22. Blowout Taper Fade with Line-Up

Razor-sharp edges around the hairline, forehead, and temples. Defines the perimeter with precision. Especially impactful on afro-textured and coily hair.
23. Blowout Taper Fade with Design

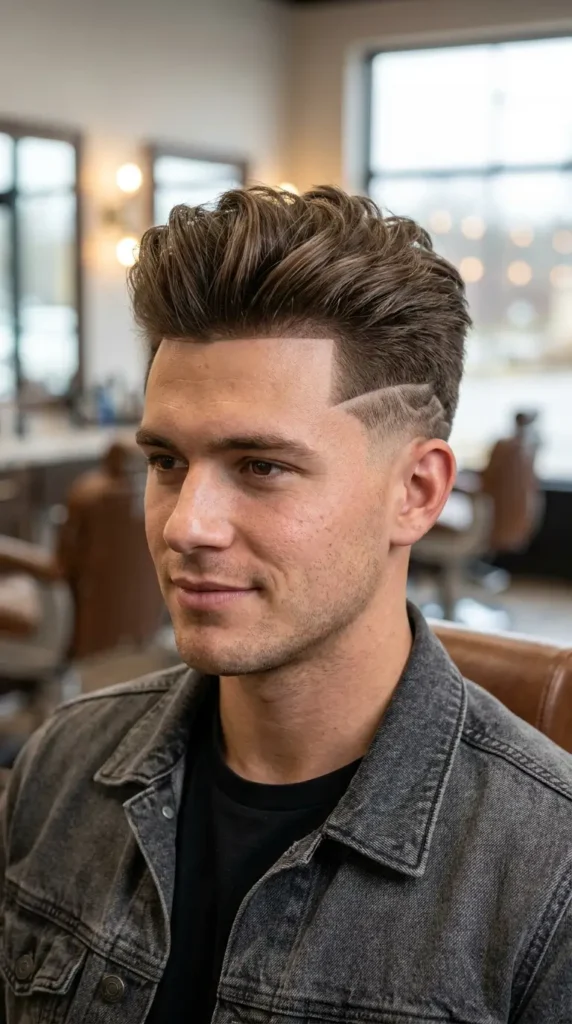
Shaved patterns, geometric lines, or artistic elements carved into the fade area. Personalises the cut into a signature look. Popular with younger demographics.
24. Disconnected Blowout Taper

Visible separation between faded sides and voluminous top — no gradual blend. Creates dramatic contrast. Works best on curly hair where texture visually bridges the gap.
25. Blonde Blowout Taper Fade

Lighter hair creates a more subtle fade appearance because the contrast between hair and skin is less dramatic. Gives a naturally lived-in, relaxed vibe without effort.
26. Burst Fade Blowout

Fade radiates in a semicircular pattern around the ear rather than running horizontally. Leaves length at the nape. A different fade shape — not a different volume technique.
27. Temple (Temp) Fade Blowout Taper

Fade concentrated at the temple area only, sharpening facial outlines. Minimal fade coverage. Works on both wavy and straight hair for a clean, understated upgrade.
28. Blowout Taper with Wolf Cut

Clean taper sides paired with layered, shaggy, longer lengths on top and back. Edgy and rebellious. Blow-dry the front upward, let the natural heavy layers flow at the back.
29. Edgar Blowout Taper

Blowout taper combined with a heavy, blunt fringe cut straight across the forehead. Controversial but undeniably trending. Love it or hate it — it fits the current moment.
30. Curly Crop Blowout Taper

Short curly top with defined shape paired with a low to mid taper fade. Tight, structured, and easy to maintain. Popular transition from a standard crop to a trendier silhouette.
31. Side-Part Blowout Taper

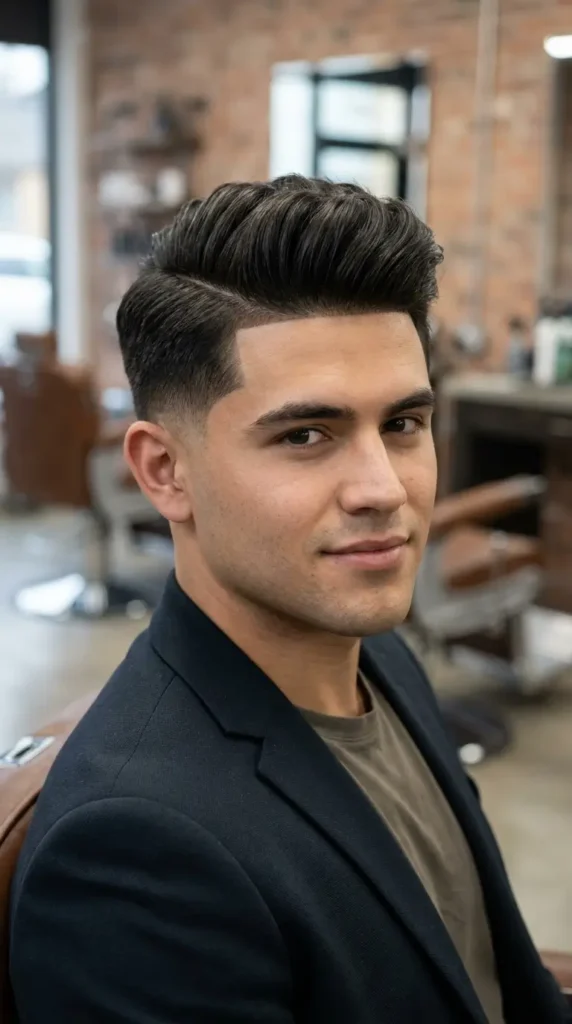
A defined side part adds structure to the airy blowout top. The fade keeps sides neat whilst the part creates a classic anchor point. Balanced, elegant, works in professional environments.
32. Blowout Taper for Older Men

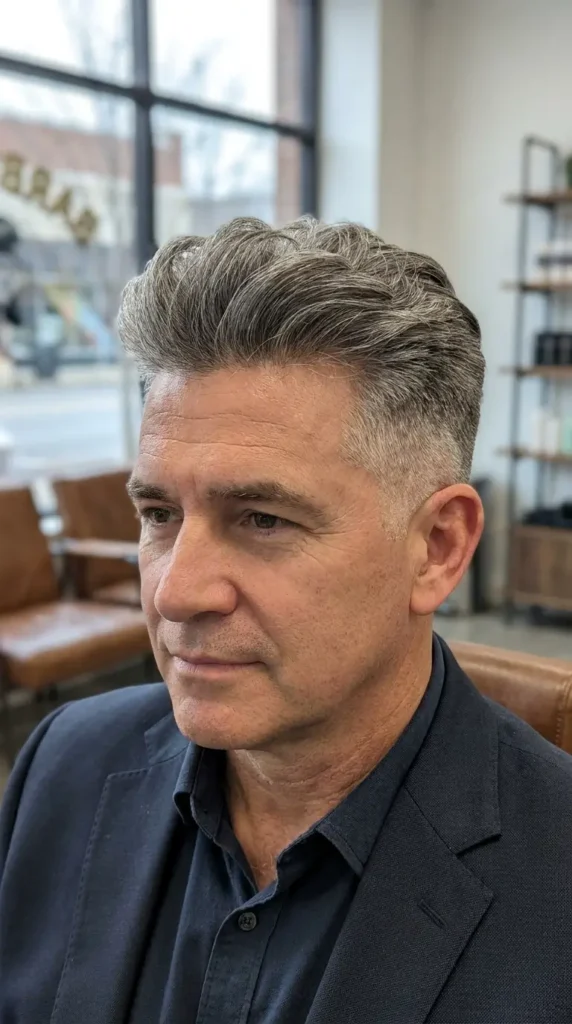
Lower taper height, less dramatic volume, more structured finish. Demonstrates that this cut is not limited to teens and twenty-somethings. Clean, distinguished, age-appropriate.
Blowout Taper Fade vs. Burst Fade vs. Brooklyn Fade
These three cuts are frequently confused. Here is how they differ:
Blowout taper fade: The fade follows a horizontal gradient across the sides and back, blending evenly from bottom to top. Volume is styled upward on the crown and top section. The overall shape is balanced and versatile.
Burst fade: The fade radiates in a semicircular pattern around the ear only, leaving length behind the ear and at the nape. The “burst” shape creates a rounded arc visible when viewed from the side. It is a fade shape difference, not a volume difference.
Brooklyn fade: A high skin fade with extreme contrast — sides taken very short or bald from the temples down, with all length concentrated at the very top. Less gradual blending and more dramatic disconnection than a standard blowout taper.
Key Point: The burst fade follows a circular pattern around the ear whilst the blowout taper follows a horizontal gradient across the full sides and back. The fade shape — not the volume on top — is what differentiates these cuts.
Tip: If you want even blending across your entire sides and back with a full top, ask for a blowout taper fade. If you want the fade concentrated only around your ears with length left at the nape, ask for a burst fade.
Blowout Taper Fade vs. Undercut vs. Pompadour Fade
Undercut: Features a sharp, disconnected line between the short sides and the long top — no blending or gradual transition. The contrast is abrupt and intentional. A blowout taper fade, by comparison, blends seamlessly.
Pompadour fade: Similar volume concept to the blowout, but the hair is styled backward (swept away from the face) rather than upward and outward. The pompadour creates height at the front hairline specifically, whilst the blowout lifts volume across the entire crown for a more rounded, all-directional silhouette.
If you want seamless blending with upward/outward volume, the blowout taper fade is your cut.
Anatomy of the Blowout Taper Fade
Fade Zones and Guard Numbers Explained
Every blowout taper fade is built across four zones of the head, each using specific clipper guard lengths:
Zone 1 — Neckline and below the occipital bone (lowest point): Guard #0 (0.5mm) or guard #0.5 (1.5mm). This is the shortest area. A skin fade starts at #0; a shadow fade starts at #0.5.
Zone 2 — Around ear level (lower-mid section): Guard #1 (3mm) to guard #1.5 (4.5mm). This blends the very short neckline upward into the mid-section.
Zone 3 — Upper sides approaching the parietal ridge: Guard #2 (6mm) to guard #3 (10mm). This is the transition zone where the fade meets the longer top section.
Zone 4 — Top and crown (longest section): Cut with scissors. Length ranges from 2 to 6 inches depending on desired blowout volume and style.
The parietal ridge — the widest point of the skull where the head begins curving inward — serves as the natural boundary between the fade and the top section. Barbers use this anatomical landmark to determine where blending transitions from short to long.
The occipital bone, located at the lower back of the skull, marks where many low and mid tapers begin their shortest point.
Fact: Clipper guard sizes follow a standardised numbering system where each full number represents approximately 3mm of cutting length. Guard #1 leaves 3mm, guard #2 leaves 6mm, and guard #3 leaves 10mm.
Tip: When communicating with your barber, referencing guard numbers removes ambiguity. Saying “take the sides to a #1 at the bottom and blend to a #3 at the top” is far more precise than “short on the sides.”
Weight Distribution and Silhouette Shape
The blowout taper fade distributes visual weight deliberately:
- Heavy on top and upper sides: The crown area holds the most density and volume, creating the signature rounded, lifted silhouette when viewed from the side.
- Light on lower sides and back: The fade removes weight progressively, creating a clean, sharp perimeter.
- The weight line sits high: Unlike traditional short-back-and-sides where weight is distributed evenly, the blowout concentrates bulk at the crown. This is what creates the “blown out” appearance.
The overall silhouette, when viewed in profile, appears rounded and lifted — wider at the crown than at the temples. This distinguishes it from flat, close-cropped styles where the head shape follows the natural skull contour.
Short vs. Long Blowout Taper Fade
Short Blowout Taper Fade (1–2 Inches on Top)
The short version maintains minimal top length with maximum fade contrast. Volume is subtle but present — a slight lift rather than dramatic height.
Best for: Active lifestyles, hot climates, men preferring minimal styling time (2–3 minutes maximum), and those wanting the blowout shape without the commitment of longer hair.
Maintenance advantage: Grows out less noticeably than longer versions. Stays presentable for 3+ weeks between cuts.
Styling: Quick blow-dry (2–3 minutes) + small amount of matte paste finger-styled through the top. No brush needed.
Long Hair Blowout Taper Fade (4–6+ Inches on Top)
The long version creates dramatic volume, movement, and maximum styling versatility. The same cut can be styled as a blowout, slicked back, tied up, or worn naturally depending on the occasion.
Trade-off: Requires more daily styling time (8–12 minutes) and stronger hold products to maintain shape against gravity.
Best hair types: Wavy and curly. These textures hold shape under the weight of longer hair. Straight hair at this length tends to fall flat without aggressive product use or a perm.
The payoff: Maximum visual impact. Long blowout tapers create the most dramatic before-and-after transformations and the most versatile styling options. For more inspiration on longer styles, explore our long haircuts for men guide.
Blowout Taper Fade with Beard
The blowout taper fade pairs naturally with facial hair because the barber can create a “beard blend” — a seamless gradient connecting the taper into the beard along the cheekline and jawline.
Pairings by taper height:
- Low taper + full beard: Cohesive, masculine, lived-in. The gradual taper flows into a full beard for a unified, natural appearance.
- Mid taper + short boxed beard: Balanced, professional. Clean sides meet a neatly shaped beard for structured grooming.
- High taper + stubble or clean-shaven: Maximum contrast, modern. The bare skin of the high fade continues into a clean jaw for a sharp, contemporary look.
Connection options: The barber can either blend the fade seamlessly into the beard (creating one continuous gradient) or disconnect them (creating a visible line where the haircut ends and the beard begins). Blended is more natural; disconnected is more structured.
Maintenance: The beard line requires touch-up at the same frequency as the taper — every 2–3 weeks — to maintain the clean connection.
Tip: Ask your barber to “blend the taper into the beard line” — this creates one continuous gradient from the fade through the sideburn into the beard, rather than an abrupt line where the haircut ends and facial hair begins.
Best Face Shapes for a Blowout Taper Fade
The blowout taper fade adapts to every face shape because barbers can independently adjust fade height, top length, and volume direction. Here is what works best for each face type:
Oval face: Any variation works. The oval face shape has naturally balanced proportions that accommodate all taper heights and volume levels. This is the most versatile face shape for haircut selection. See our short haircuts for oval faces guide for additional style options.
Round face: Low to mid taper + maximum volume on top. Added vertical height elongates the face. Avoid high fades that expose the full width of the round face shape at the sides. Our hairstyles for round heads guide covers this in more detail.
Square face: High taper + textured volume. The height draws attention upward and softens the angular jawline’s horizontal emphasis. The textured top adds organic movement that counters the face’s geometric structure.
Oblong or rectangular face: Low taper + moderate volume only. Avoid excessive height which further elongates an already long face. Keep volume wider rather than taller — a textured fringe styled slightly forward works better than a straight-up blowout.
Heart face: Mid taper + wider volume at the crown. The fuller crown balances the narrower chin, creating proportional harmony between the wider forehead and pointed jaw.
Diamond face: Mid taper + textured fringe. The fringe softens the wide cheekbones by adding coverage at the forehead, whilst the mid taper maintains the natural narrowness at the temples.
Key Point: The blowout taper fade is one of the few men’s haircuts truly adaptable to every face shape because barbers can independently adjust three variables — fade height, top length, and volume direction — to create proportion-specific results for any skull structure.
Tip: If you are unsure of your face shape, ask your barber during the consultation. Experienced barbers identify face shape within seconds and will recommend the taper height that creates the most balanced proportions for your specific bone structure.
How to Ask Your Barber for a Blowout Taper Fade
Clear communication prevents haircut disappointment. Here are word-for-word scripts you can use or screenshot for your next appointment:
For a low blowout taper: “I want a low taper starting just above my ears, blended to a 1 or 1.5 guard at the neckline, with all the length and volume kept on top. I want it blow-dried up and out for a full shape.”
For a mid blowout taper fade: “I’d like a mid taper fade, starting around ear level, going down to a zero or half guard at the neckline. Keep 3–4 inches on top. I want a textured blowout finish with volume.”
For a high skin fade blowout: “I want a high skin fade — bald at the bottom, blended up to the temples — with all the length kept on top for a blowout. Style it with maximum lift and texture.”
For a textured fringe blowout: “Give me a mid taper fade on the sides with a textured fringe on top. I want the fringe long enough to fall forward but styled with some lift and separation. Keep it choppy and layered.”
For a blowout taper with skin fade: “I want a blowout taper with a skin fade — take it to skin at the bottom, blend it seamlessly up through the sides, and keep full length and volume on top. Style it with a blowout finish.”
Three things to always communicate:
- Fade height (low, mid, or high)
- Guard number at the shortest point (#0, #0.5, #1)
- Top length in inches and desired finish (textured, messy, clean, fluffy)
Always bring reference photos. Save 2–3 images on your phone showing front, side, and back angles. A barber can replicate what they can see far more accurately than what they must interpret from words alone.
Key Point: Barbers report that clients who bring a reference photo AND verbally describe their desired fade height and top length receive significantly more accurate results than those who use vague descriptions like “short on the sides, long on top.”
Guard Number Guide for Blowout Taper Fades
| Guard Number | Length | Typical Use |
|---|---|---|
| #0 | 0.5mm | Skin fade base — closest without razor |
| #0.5 | 1.5mm | Shadow fade — very close but not bald |
| #1 | 3mm | Low fade starting point |
| #1.5 | 4.5mm | Blending transition between zones |
| #2 | 6mm | Mid taper blending point |
| #3 | 10mm | Upper transition / high taper starting area |
Barbers use guards in sequence for smooth blending — never jumping from #0 to #3 directly. Each guard overlaps the previous by approximately half an inch of head surface to prevent visible lines or steps in the gradient.
Fact: Professional barbers typically use 4–6 different guard lengths in a single blowout taper fade to achieve seamless blending. Each guard transition overlaps the previous zone to create an invisible gradient rather than visible steps.
How to Style a Blowout Taper Fade at Home
Follow this exact sequence for maximum volume every morning:
- Start with towel-dried, damp hair — not soaking wet, not fully dry. Approximately 70% dry is ideal.
- Apply heat protectant spray — 3–4 sprays distributed evenly. This prevents damage from daily heat exposure.
- Apply volumising mousse to roots only — pea-sized amount, emulsified between palms, then pressed into the root area of the crown and top. Do not apply to ends.
- Attach the concentrator nozzle to your blow-dryer. This narrows airflow for precise directional control.
- Set blow-dryer to medium heat, high airflow. High heat damages; medium heat with strong airflow provides sufficient lift.
- Lift a section of hair with your fingers or a round brush. Elevate hair away from the scalp.
- Direct airflow AGAINST the natural growth direction at the roots. If hair naturally falls forward, blow it backward. If it falls right, blow left. This opposition creates root lift.
- Work section by section across the crown and top — front, middle, back. Spend 15–20 seconds per section.
- Once 90% dry, switch to the cool shot button. Blast cool air in the same upward direction for 10 seconds per section. Cool air sets the hair shaft in its lifted position.
- Apply finishing product to ends only — dime-sized amount of matte clay or texture powder. Work between fingertips first, then pinch and pull through the top for separation and hold.
Total time: 5–10 minutes for medium-length top (3–4 inches).
Key Point: The most common mistake in home blowout styling is applying heat in the same direction hair naturally grows. Volume is created by blowing AGAINST the growth direction, which forces the root to stand upward rather than lie flat.
Tip: Finish every blow-dry session with 10 seconds of cool air in the same upward direction. Cool air “sets” the hair shaft in its lifted position, preventing it from falling flat within the first hour. This step alone can extend your volume by 3–4 hours.
Daily Quick-Style Routine (Without Rewashing)
You do not need to wash and fully re-blow-dry every single day. Here is the day 2–3 refresh routine:
For straight and wavy hair:
- Lightly mist roots with water spray — just enough to dampen, not soak
- Re-blow-dry for 2–3 minutes focusing only on roots at the crown
- Apply a small amount of texture powder for refreshed grip and volume
For curly and coily hair:
- Skip water — use dry shampoo at roots if needed for oil absorption
- Scrunch curls upward with hands to reactivate shape
- Apply a tiny amount of curl cream to any frizzy areas
Why not wash daily: Over-washing strips natural oils from the scalp, which actually makes hair harder to style. The scalp overproduces oil to compensate, creating a greasier cycle. Every other day (or every 2–3 days for curly hair) is the optimal wash frequency for maintaining blowout style and scalp health.
Best Products and Tools for a Blowout Taper Fade
Best Products and Tools for a Blowout Taper Fade are:
Essential Styling Products
Pre-stylers (applied to damp hair before blow-drying):
- Volumising mousse: Lightweight foam applied at roots for lift. Best for fine and thin hair. Pea-sized amount is sufficient — more creates stiffness.
- Heat protectant spray: Prevents damage from daily blow-drying. Essential for ALL hair types. 3–4 sprays distributed evenly through damp hair.
- Blow-dry cream: Smoothing + light hold. Best for thick, coarse, or frizzy hair that needs control during drying.
Finishing products (applied after blow-drying to dry hair):
- Matte clay or matte paste: Medium hold, no shine, textured finish. The most versatile finishing product for blowout tapers. Dime-sized amount worked between fingertips first.
- Texture powder: Zero-weight grip and volume boost. Best for fine hair and second-day touch-ups. Sprinkle directly onto roots.
- Sea salt spray: Wave enhancement + beachy texture. Best for wavy hair. 4–6 sprays, then scrunch.
- Light-hold hairspray: Locks shape without stiffness. Best for long blowouts that need all-day hold without crunchiness.
Curl-specific products:
- Curl cream: Defines and moisturises coils without crunch. Apply to damp hair before diffusing.
- Light-hold gel: Holds curl pattern during diffusing for maximum definition. Scrunch out the crunch once dry.
The golden rule: Apply finishing products to ends and mid-lengths ONLY. Applying directly to roots collapses the lift created during blow-drying. Start with less product than you think you need — you can always add more, but you cannot remove excess without rewashing.
Key Point: The single most important product rule for maintaining a blowout taper fade is applying finishing products to ENDS AND MID-LENGTHS ONLY. Product applied directly to roots collapses the lift created during blow-drying and flattens the entire style.
Essential Tools
Blow-dryer (1800W minimum): Sufficient power ensures fast drying with strong airflow. Underpowered dryers require longer heat exposure, increasing damage risk.
Concentrator nozzle: The narrow attachment that focuses airflow into a precise stream. Essential for directional root lifting. Most blow-dryers include this attachment — if yours is missing, purchase a universal-fit nozzle.
Diffuser attachment: For curly and wavy hair only. Disperses air across a wide area to dry curls evenly without disrupting their natural pattern.
Round brush (medium barrel, 35–45mm): Creates smooth volume and directional lift during blow-drying. Roll hair around the brush, apply heat, then release for bouncy, lifted sections.
Wide-tooth comb: Detangles damp hair before blow-drying without pulling or breakage. Essential for curly and longer hair.
Trimmer (cordless, for home maintenance): Keeps neckline and sideburn edges clean between barber visits. Use only for perimeter cleanup — never attempt the actual fade at home.
Maintenance Schedule and Grow-Out Timeline
Week-by-Week Grow-Out Guide
Understanding how the blowout taper fade evolves after cutting helps you plan barber visits and manage expectations:
Week 1 (Days 1–7): The cut is at its sharpest. Lines are crisp, the fade is defined, contrast is maximum. Easiest period for daily styling — the shape does most of the work.
Week 2 (Days 8–14): Still looks sharp to most observers. Slight softening of fade lines begins. Neckline grows slightly but remains tidy. Top length increases marginally, allowing slightly more volume.
Week 3 (Days 15–21): Fade loses visible definition. The gradient becomes softer and less dramatic. Neckline may appear uneven or fuzzy. Top length is at maximum styling potential. This is the ideal window to schedule your next appointment.
Week 4 (Days 22–28): Fade is visibly grown out. Lines are soft. The cut still looks intentional if properly styled, but it no longer reads as “fresh.” Most men visit the barber before reaching this stage.
Fact: Human hair grows at an average rate of approximately 1.25 cm (half an inch) per month. A skin fade starting at 0mm will have approximately 3mm of visible growth after just 2 weeks — enough to soften the gradient noticeably.
At-Home Maintenance Between Barber Visits
What you CAN do at home:
- Neckline cleanup: Use a trimmer to remove stray hairs growing below your natural neckline. Follow the same shape your barber created — whether that is straight (blocked), rounded, or tapered.
- Sideburn maintenance: Keep sideburns trimmed to the length your barber set. Do not let them grow longer between visits.
- Daily blow-dry styling: Consistent daily styling maintains the appearance of freshness even as the fade grows. A well-styled grown-out taper looks better than a fresh fade that is not styled.
- Scalp care on fade areas: Moisturise exposed skin on fade areas (especially skin fades) to prevent dryness and irritation. Apply lightweight moisturiser or scalp oil.
- Overnight preservation: Sleep on a silk or satin pillowcase. Cotton pillowcases create friction that flattens volume and disrupts curl patterns overnight.
What you should NEVER do at home:
Do not attempt to blend, correct, or clean up the actual fade or taper. One wrong clipper pass creates a visible line or bald patch that only a professional barber can fix. Limit home maintenance strictly to the perimeter — neckline and sideburns only.
Tip: Never attempt to blend or correct the fade itself at home. One wrong guard pass creates irreversible damage that only your barber can fix at the next appointment. Stick to perimeter cleanup only — neckline and sideburns.
How Much Does a Blowout Taper Fade Cost?
US pricing guide:
- Standard high-street barbershop: $20 – $35 depending on location and barber experience
- Premium or specialist barber: $35– $40
- High-end or celebrity barber (major city): $60 – $100+
- Blow-dry styling finish: Some barbers include this; others charge $5 – $10 additionally
Monthly budget at 2–3 week intervals: $40–$70 per month for regular maintenance appointments.
Factors affecting price: Location (London prices are 30–50% higher than regional), barber experience level, whether line-up or design elements are included, and time required (thick or long hair takes longer).
Is the Blowout Taper Fade Still Trending in 2026?
The blowout taper fade remains one of the top 3 most-requested men’s haircuts in 2026. It has successfully transitioned from a viral social media trend into a permanent barbershop staple — similar to how the classic fade itself evolved from trend to timeless throughout the 2010s.
The evolution timeline:
- 2023: Gained mainstream traction through TikTok transformation videos
- 2024: Peaked in social media virality — #blowouttaper accumulated billions of views
- 2025: Became a standard barbershop offering rather than a “specialty request”
- 2026: Now a permanent fixture. Barbers customise the silhouette more aggressively to individual face and head shapes rather than following one uniform template
2026 specific developments: The current iteration emphasises personalisation over uniformity. Rather than every blowout taper looking identical, barbers now adjust the silhouette, texture, and volume direction specifically to each client’s skull shape, growth pattern, and lifestyle. Textured finishes dominate over smooth, and asymmetry is embraced rather than avoided.
The blowout taper fade is no longer a passing trend — it has entered the permanent rotation of classic men’s hairstyles alongside the crew cut, side part, and standard fade.
Common Mistakes to Avoid
1. Over-blending the taper: Excessive blending removes all contrast and makes the fade invisible. The result appears like a mushroom shape — uniform density from top to bottom with no visual gradient. The taper should be smooth but visible. Fix: Ask your barber for a “defined blend” rather than an “ultra-soft blend.”
2. Under-blending: Leaving visible lines or steps in the gradient where one guard length abruptly meets the next. This looks unfinished and unprofessional. Fix: A skilled barber uses clipper-over-comb technique and multiple overlapping guard transitions to prevent lines.
3. Applying too much product: Excess product weighs hair down, kills volume, and creates a greasy or stiff appearance. The blowout depends on lightweight airiness. Fix: Start with half the amount you think you need. Add more only if necessary. Remember — product goes on ends, not roots.
4. Using the wrong product type for your hair type: Heavy clay on fine hair = instant flatness. Light spray on thick hair = zero hold. Matching product weight to hair density is critical. Fix: Fine hair = mousse + powder. Medium hair = light clay. Thick hair = texture spray + light paste.
5. Blow-drying WITH your growth direction: This creates zero volume because you are reinforcing the flat, natural position of the hair. The blowout requires opposition. Fix: Always blow against your natural growth pattern. Forward-falling hair must be blown backward. Side-falling hair must be blown upward.
6. Skipping heat protectant: Daily blow-drying without protection causes cumulative dryness, breakage, split ends, and dull texture within weeks. Fix: Apply heat protectant to damp hair before every single blow-dry session. No exceptions.
7. Attempting fade correction at home: One wrong clipper pass with the wrong guard creates an irreversible bald patch or visible line in the fade. There is no “undo” button. Fix: Only maintain the perimeter (neckline, sideburns) at home. Leave the fade entirely to your barber.
8. Choosing the wrong taper height for your face shape: A high fade on an oblong face exaggerates vertical length. A low fade on a round face fails to add the elongation that would balance proportions. Fix: Refer to the face shape guide above, or ask your barber to recommend the height that balances your specific proportions.
Frequently Asked Questions
What is a blowout taper fade?
A blowout taper fade is a men’s haircut combining a gradual taper or fade on the sides and back with a voluminous, blow-dried top styled for height and texture. The three components — tapering, fading, and blow-dry styling — work together to create a clean silhouette with a full, lifted crown. It suits all hair types including curly, wavy, straight, and afro-textured hair.
How long does a blowout taper fade last?
A blowout taper fade stays sharp for approximately 2–3 weeks before the gradient begins softening visibly. Most barbers recommend scheduling touch-up appointments every 14–21 days for low and mid tapers, and every 10–14 days for high skin fades. Daily blow-dry styling extends the fresh appearance between visits.
What is the difference between a blowout taper and a blowout fade?
A blowout taper reduces hair gradually but does not necessarily go to skin level, whilst a blowout fade blends hair completely down to skin for higher contrast. The taper is more subtle and conservative; the fade is bolder and more dramatic. Many modern cuts combine both — a taper in upper zones and a fade at the neckline.
What is a blowout taper with skin fade?
A blowout taper with skin fade takes hair all the way down to bare skin at the lowest point, creating maximum contrast between the exposed scalp and the voluminous top. The skin fade version is bolder than a standard taper and requires touch-ups every 10–14 days because the 0mm starting point shows regrowth quickly.
Does a blowout taper fade work for curly hair?
Curly hair is the ideal texture for a blowout taper fade because natural coils hold volume and shape without heavy products or extensive styling. A diffuser attachment preserves the curl pattern whilst adding lift. Curly blowout tapers typically maintain their shape for 3–5 days between restyling sessions.
How do I ask my barber for a blowout taper fade?
Say “blowout taper fade” and specify three details: fade height (low, mid, or high), desired guard number at the shortest point, and top length in inches. Bring 2–3 reference photos showing front, side, and back angles. Mention whether you want a textured, messy, or clean finish on top.
Can I style a blowout taper fade with straight hair?
Straight hair requires volumising mousse at the roots and blow-drying against the natural growth direction to achieve blowout volume. Texture powder applied after drying adds grip and lift that straight hair naturally lacks.


